Automation Skill Builder
Get from install to a working automation on your machine — then package it for reuse.
Start1. Overview
This guide helps you start the app, open the Control Panel, complete a first task, and package a reusable Skill.
Work happens on your computer. You design and confirm automations in the Control Panel; you can optionally connect an AI assistant so it can use your local tools while you record.
Typical order: start the app → open the Control Panel → finish a first task → adjust Settings only when you need to.
I just want to…
Pick one goal and follow only these links — you can ignore the rest of the table of contents for now.
Screenshots: figures may show Chinese UI labels. Button names in your Control Panel follow Settings → language — match by position and icon when the wording differs.
More reading paths
Product reading: Compatible AI services · Ecosystem: authoring, gateway, outputs.
Start2. Glossary (use these names everywhere)
One meaning per term across this help and the UI. Prefer these words over synonyms.
| Term | Meaning | Do not call it… |
|---|---|---|
| Control Panel | The local web UI (usually http://127.0.0.1:8800) where you design and run automations. |
dashboard, console, backend, admin |
| Sidebar | Left navigation in the Control Panel (modes, utilities, Settings). | menu bar, ribbon |
| Settings | The Settings dialog opened from the Sidebar (Overall, Security, models, MCP, …). Inside Overall, the Basics chip covers language / machine identity. The Overall settings button on the environment / welcome checklist opens this same Overall tab (DB / OCR / OpenCV). | preferences, config page |
| Capability | A ready-made automation action in the catalog (screenshot, mouse click, OCR, …). | plugin, widget; do not confuse with Skill |
| Skill | A packaged automation you can list, install, and run from the Control Panel (or via an AI assistant when connected). | script, Capability, MCP tool |
| FastSkills | The built-in runtime that lists and runs Skills. | marketplace only, “skills server” alone |
| Start / Stop AI design | Sidebar control that starts or stops AI design recording (primary path). | “start recording” alone (that label is for classic code-toolbar recording) |
| Design via AI workspace | Mode that connects a familiar Agent/IDE over MCP. | Efficiency first (soft wording) |
| Design with internal model | Mode that prefers designing with a model endpoint you control (UI mode name). | Trusted AI / Sovereignty - Trusted AI (old dual labels) |
| Recording / Replay | Capture of the steps you drive (often with AI design), then a script you can run again. | macro, tape, log dump |
| Host automation | Desktop mouse, keyboard, and window actions on this computer. | remote API, RPA agent |
| MCP | A connection that lets an AI assistant call your local tools. | plugin API, “Claude skills” alone |
| Service API key | Optional secret in Settings → Security that protects a few sensitive actions (run code, browser automation, Skills). | license key, OpenAI key |
| Key Vault | Encrypted secret store in Settings → Security → Key Vault for passwords and API keys used by automations. | password file, .env dump, “secrets folder” |
| Playwright | Optional browser automation used when you prepare a CDP browser and drive web pages. | Selenium (unless you mean a different tool) |
Why this matters: the same labels in the UI and in this help make steps easier to follow.
Start3. Quick start
Get from install to your first useful action in the Control Panel.
-
Start the application
Launch Automation Skill Builder. Allow permission prompts when asked (especially on macOS — §12.1). Wait until the tray or splash shows the local service is ready. -
Open the Control Panel
In Chrome or Edge, go tohttp://127.0.0.1:8800. Confirm the Sidebar loads. -
Set the language (optional)
Open Settings → Overall, choose the display language, then Save if prompted. -
Complete one small action
Either follow main flow steps 0–6, or open the Capability picker and try the first screenshot.
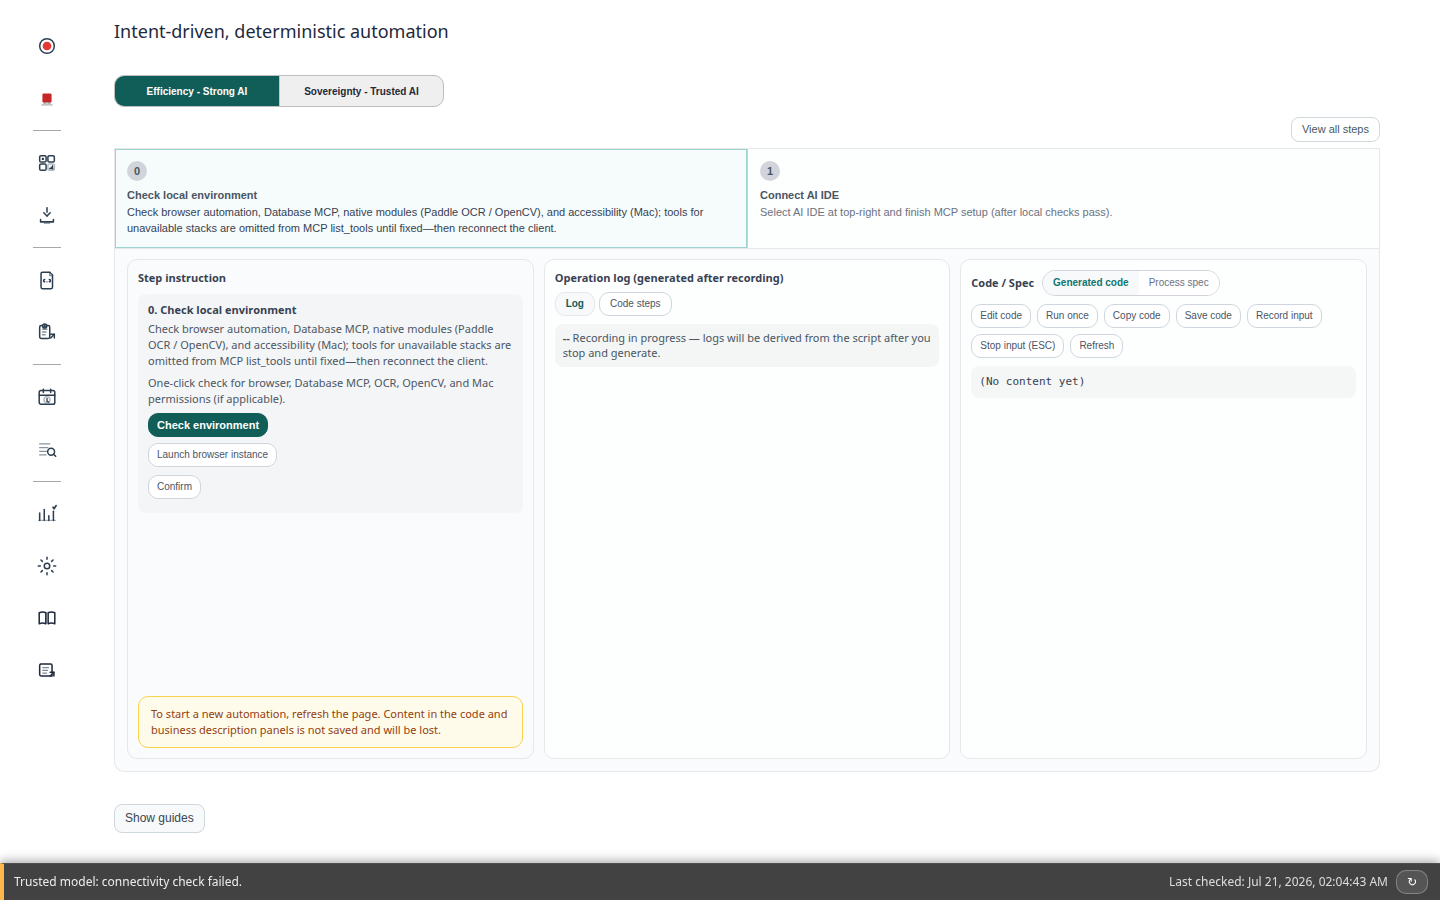
5-minute checklist — am I ready?
Tick these before a longer recording session:
- ☐ Control Panel opens and the Sidebar is visible.
- ☐ Step 0 / environment check shows no red blockers (or you know why an item is skipped).
- ☐ Capability picker opens from the Sidebar.
- ☐ You can click Start AI design and see the recording overlay — then Stop AI design (even if you recorded nothing useful).
If any box fails, jump to §12.0 Symptom → fix before spending time on a full flow.
Start4. Install
4.1 What you need
- Packaged app: install the build for your OS. You do not need to install Python just to open the app. Some optional features (browser automation, certain Skills) may ask for extra tools — follow on-screen checks in the Control Panel and the download page.
- First-time vision / OCR: the first run may download models and need several GB of free disk space. Stay online until that finishes.
Platform notes
Practical minimum
- Architecture: 64-bit OS recommended.
- Memory: 8 GB+ recommended for OCR and models. 4 GB is often too tight.
- Disk: room for the app plus model caches (several GB).
- Browser: current Chrome or Edge (Chromium) to open the Control Panel (default address often port 8800).
Windows — use the official installer or .exe. Prefer Windows 10 (64-bit) or newer.
CPU note (Windows OCR packages)
Standard Windows builds that include on-device OCR need a modern 64-bit CPU. Very old chips may fail to start that package — contact your provider if you need a special build.
macOS — after install, open System Settings → Privacy & Security and allow Skill Builder (and Terminal/IDE if you start from there) for:
- Accessibility — mouse, keyboard, most automation
- Input Monitoring — some input paths
- Screen Recording — screenshots and screen OCR
- Automation — when driving other apps
Then quit and restart the app — see §12.1.
Linux — use a graphical desktop session for the tray/splash. Window-title helpers may need common desktop utilities; Wayland-only setups can be limited.
4.1.5 Optional features at a glance
Use Settings and the in-app capability checklist to see what is ready on your machine. Typical options:
- Browser automation — prepare a CDP browser from step 0 when the UI asks for it.
- Database tools — enable from Settings when offered; Docker Desktop may be required on some installs (§11).
- Skills (FastSkills) — list and run packaged Skills from the Control Panel after the runtime is healthy.
Sidebar → Health check & statistics (or Settings → Advanced → Capabilities) shows live status. Offline Skill issues: §12.5.
4.2 Port and address
Most users keep the default Control Panel address http://127.0.0.1:8800. If the port is already in use, change the port in your launcher options or ask your administrator — then open the new address in the browser.
Start5. Open the Control Panel
Open the local web UI where you design, run, and package automations.
- Open Chrome or Edge.
- Go to http://127.0.0.1:8800.
- Confirm the Sidebar and step guide load.
If the page does not load: another program may be using port 8800. Pick a free port in the launcher, restart, and open the new address shown there.
5.1 HTTPS trust (optional)
Some builds also offer a local HTTPS address (often port 8843). The first time, the browser may warn about a self-signed certificate.
macOS + Chrome
- Open Keychain Access and import the certificate the app created (or open the
.crtfile it shows). - Set Trust → When using this certificate → Always Trust (at least for SSL).
- Quit Chrome completely (Cmd+Q) and reopen it.
- Open the HTTPS address shown in the app.
Windows: import the .crt into Trusted Root Certification Authorities, then fully restart Chrome.
Trust only the certificate file the app created on this machine. Never share private key files.
Everyday6. Main UI
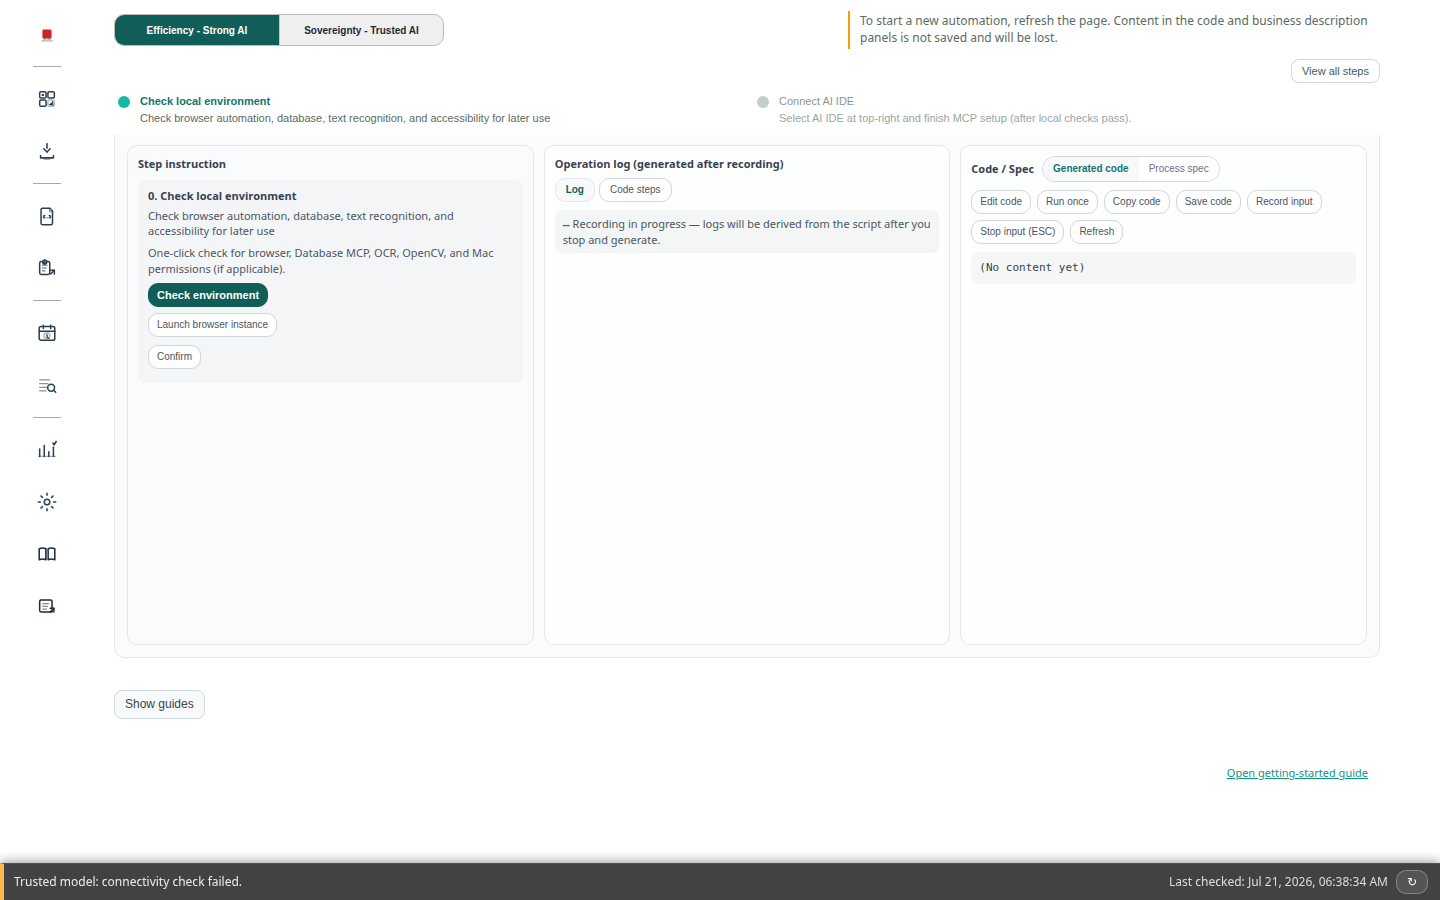
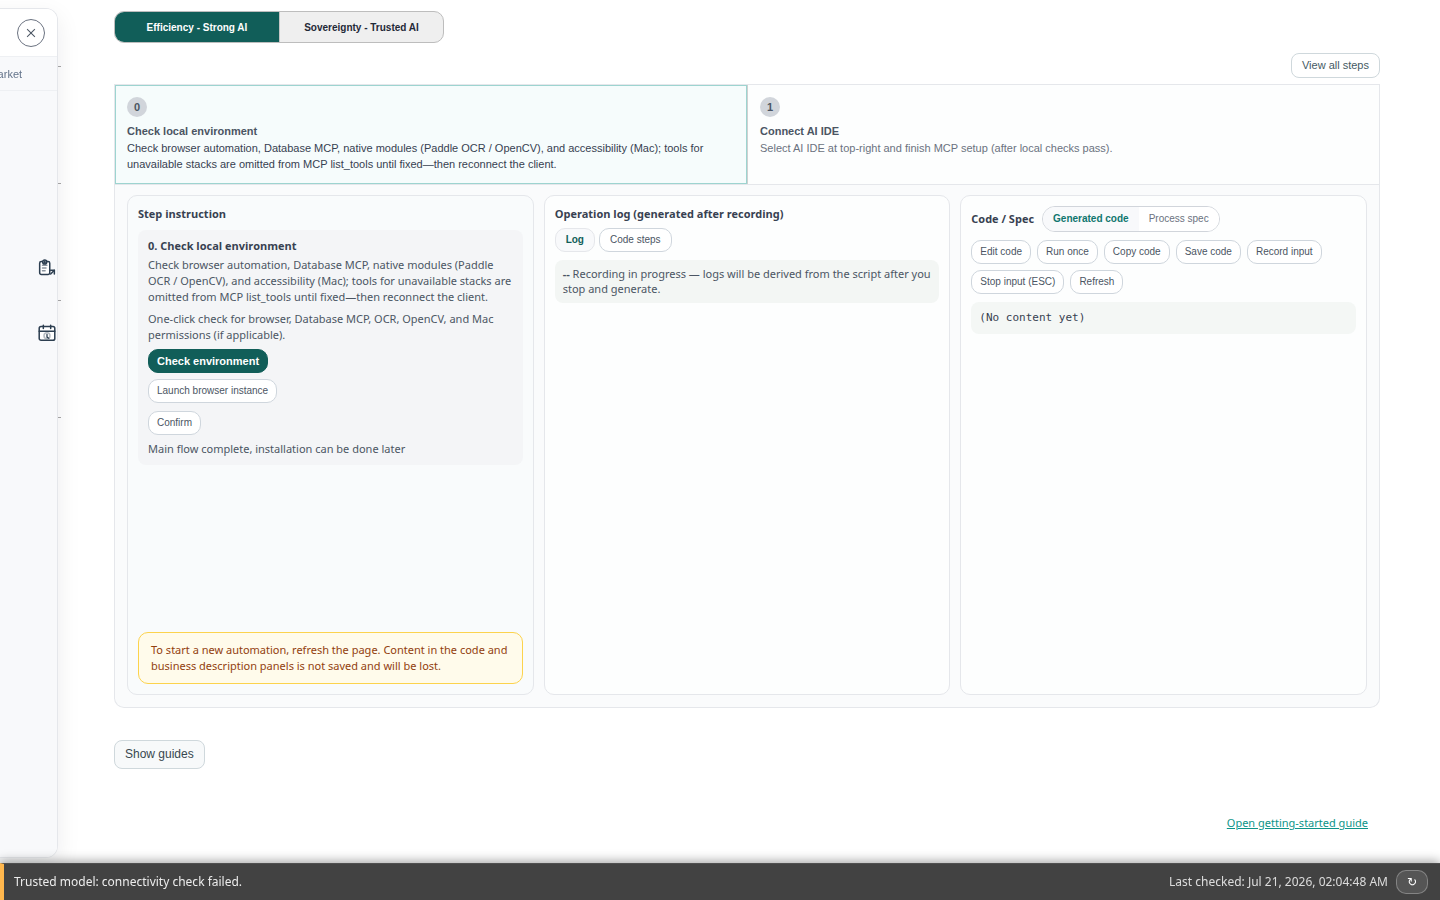
- Sidebar — start/stop AI design recording, Capability picker, Skill tools, schedule, replay log, Health check & statistics, Settings.
- Step guide (0–6) — the main How to use path: check environment → connect AI IDE → start AI design → stop → run once → generate Skill → install (optional).
- Step help / operation log / code panel — explain the current step, show results, hold generated code or a flow description.
- Mode switch — Design via AI workspace vs Design with internal model as labeled in the UI.
- Language — Settings → Overall.
First open: a short welcome wizard may appear (environment → connect AI → AI model → test recording). You can open it again from the UI later.
6.1 Welcome wizard (four steps)
On first open you may see the welcome tour. You can reopen it later from the UI, or enable/disable it under Settings (“Show welcome slides when opening the app”). Use the language menu in the wizard header to match the Control Panel language — screenshots below follow that language when available.
What this wizard is for: confirm the machine can record, connect an AI workspace (or skip), verify the shared AI model connection if you use business description, parameter extraction, or AI post-run, then run a short test. It does not replace day-to-day Settings. When you finish, the Control Panel highlights main flow step 0 — continue 0→6 (§8.1).
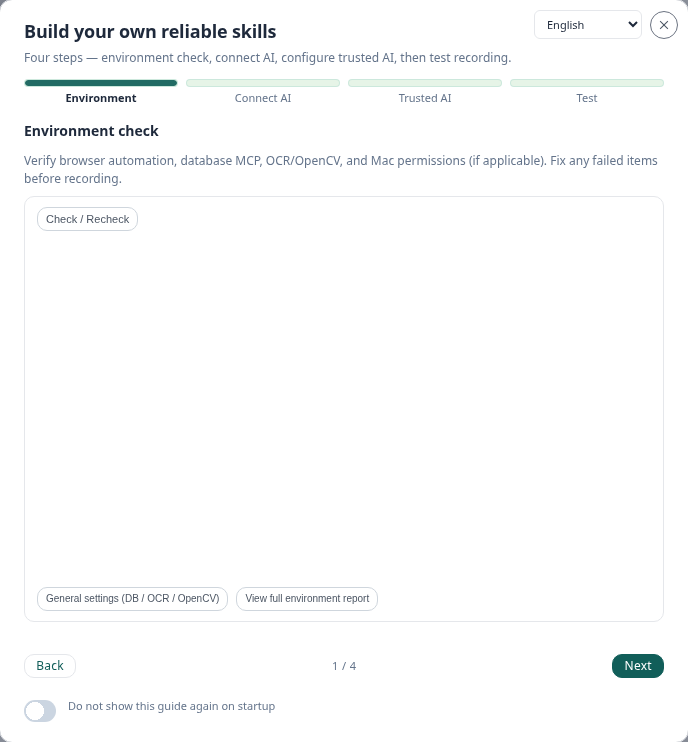
Step 1 — Environment
Check browser automation, OCR / OpenCV, optional database tools, and macOS permissions when shown. Click Check / Recheck, fix any failed (red) items, then continue. Use Overall settings or View full environment report when you need details. Skipping with red items may cause recording or later runs to fail.
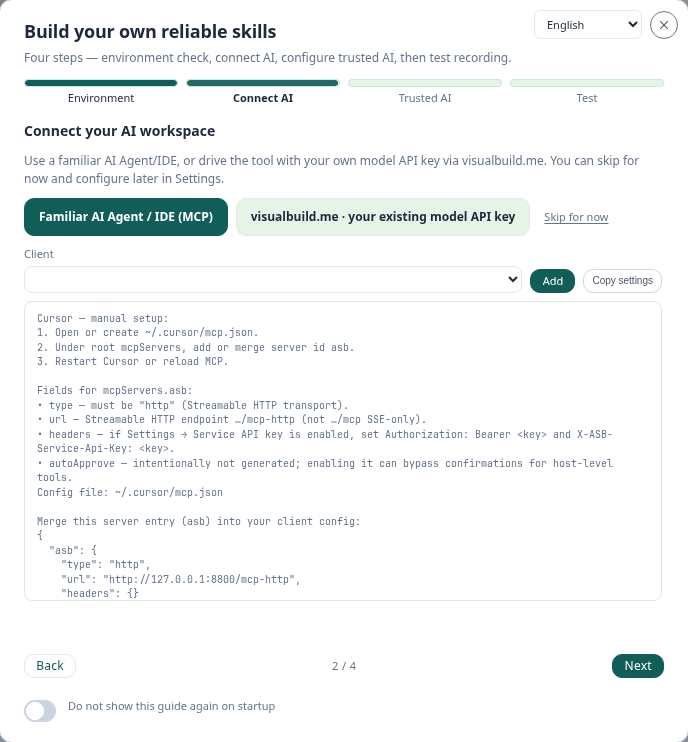
Step 2 — Connect AI
Choose how you will drive design: a familiar AI Agent / IDE (MCP), or visualbuild.me with your own model API key. You can Skip for now and finish later in Settings.
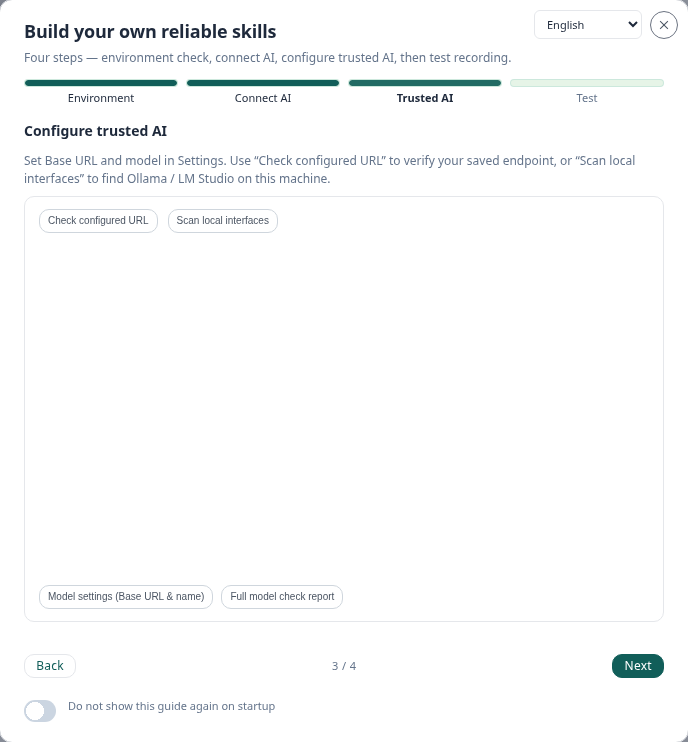
Step 3 — AI model
Confirm the saved service address and model name under Settings → AI model (used for business description, parameter extraction, code analysis, and AI post-run — not required for AI design recording). Use Check configured URL or Scan local interfaces (Ollama / LM Studio), then open model settings if needed.
Step 4 — Test
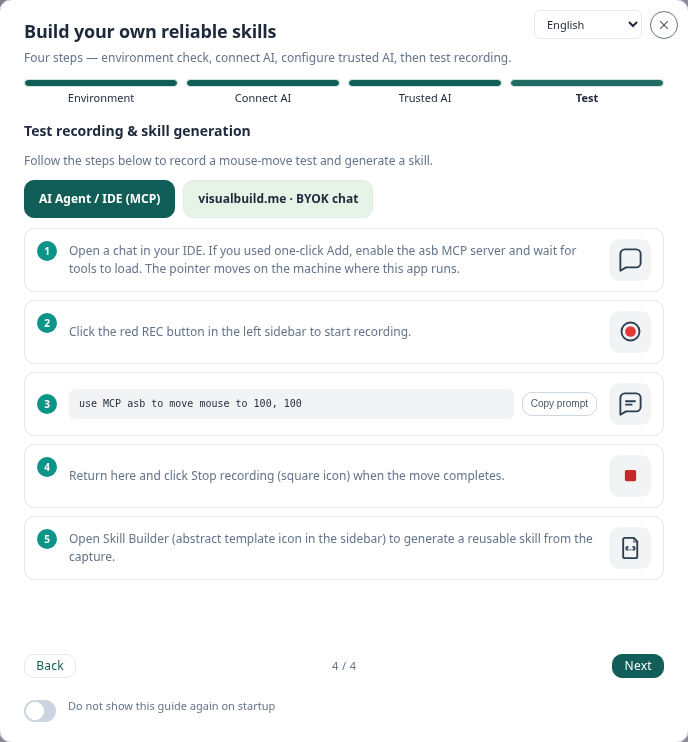
Run a short recording test so Start/Stop AI design works on this machine. When the test looks good, finish the wizard (optional: turn off “show again on startup”). Closing returns you to main flow step 0 — keep going through steps 0→6.
6.2 Design modes vs Settings → AI model
The Control Panel mode switch (and welcome step 2) offers two ways to work with AI. Short rule: already using Cursor / an IDE → left; must use an in-house model → right.
- Design via AI workspace — connect a familiar Agent/IDE (Cursor, VS Code, Claude Desktop, …) via MCP. Fast for design and recording when you already live in that IDE.
- Design with internal model — prefer designing against a model endpoint you control. This mode is separate from the shared AI model connection used for business description, AI parameter extraction, and AI post-run (Settings → AI model).
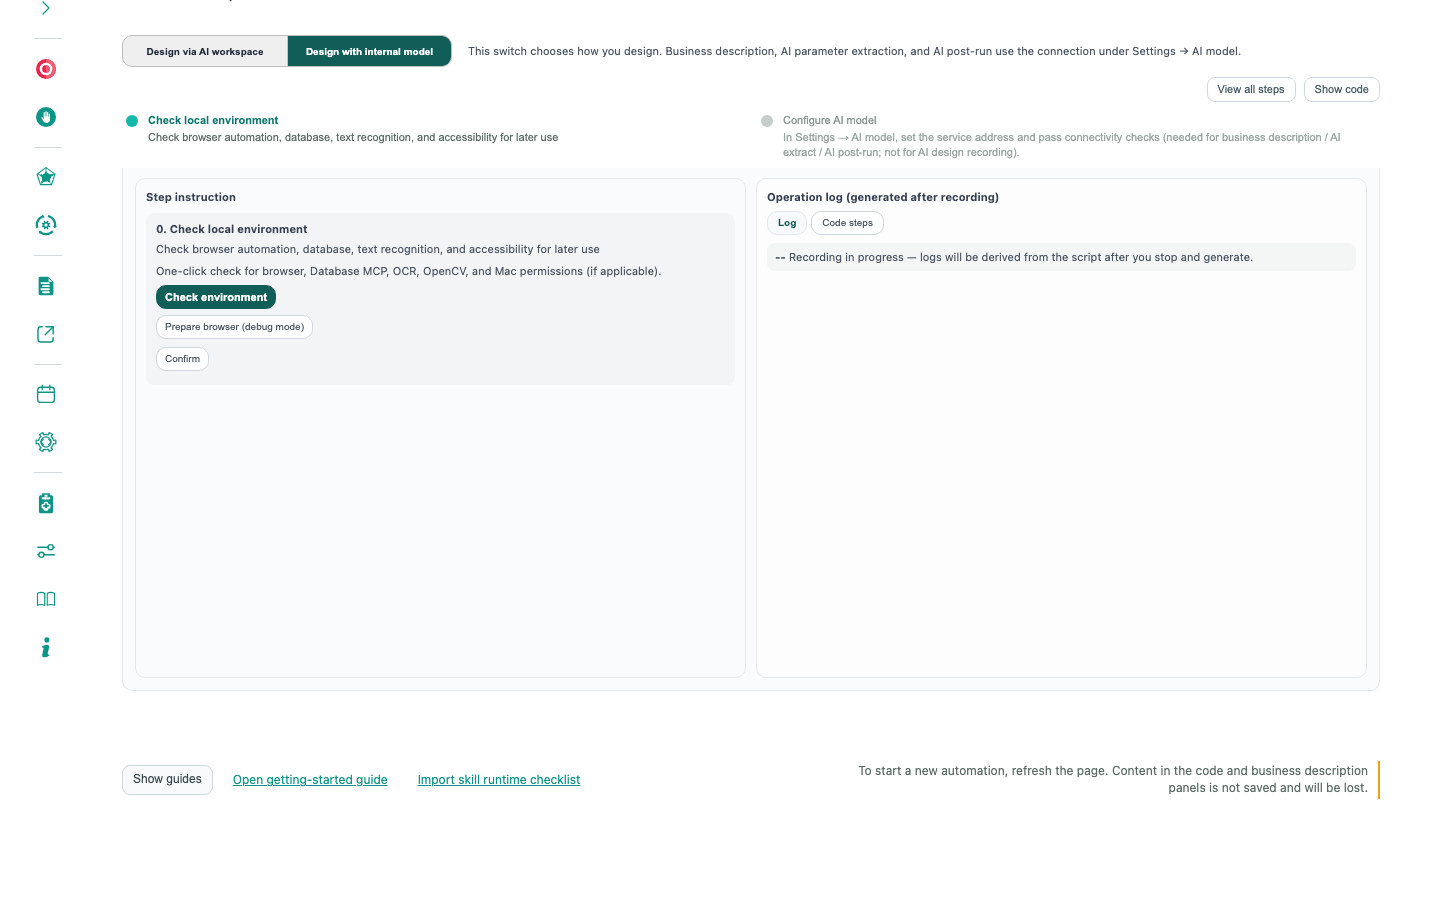
You can change your mind later in Settings. Packaged Skills / executables still run locally without calling a model at runtime.
6.3 Show or hide workspace panels
Use the toolbar control to show or hide the capabilities, favorite Skills, and available Skills panels.
- Hide — more room for the step guide and code panel while you record or edit.
- Show — bring the catalogs back when you need to pick a Capability or run a Skill.
Everyday7. Settings
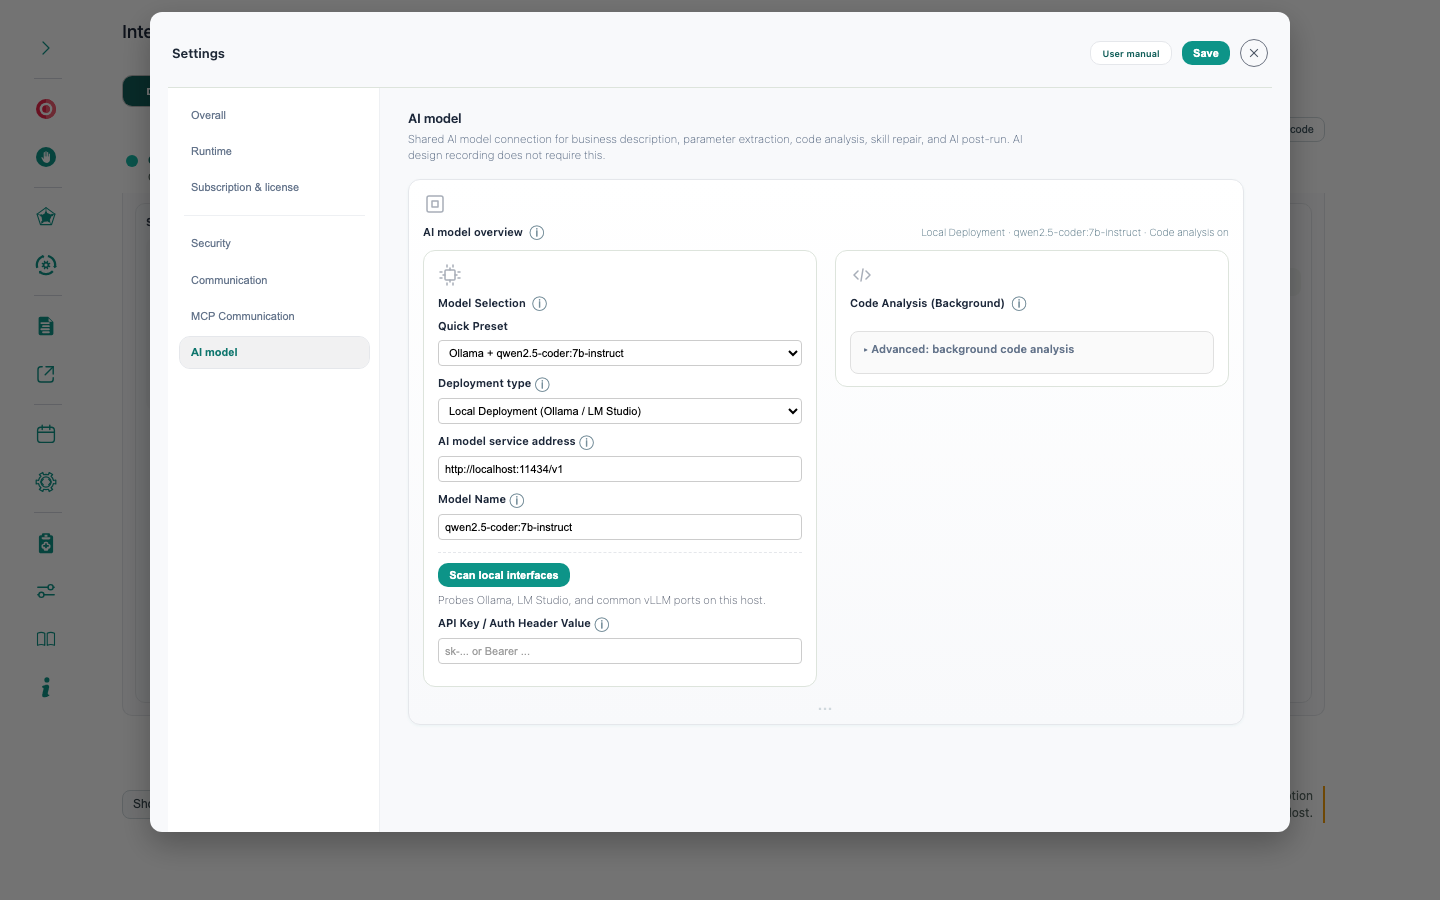
7.0 What should I change? (by goal)
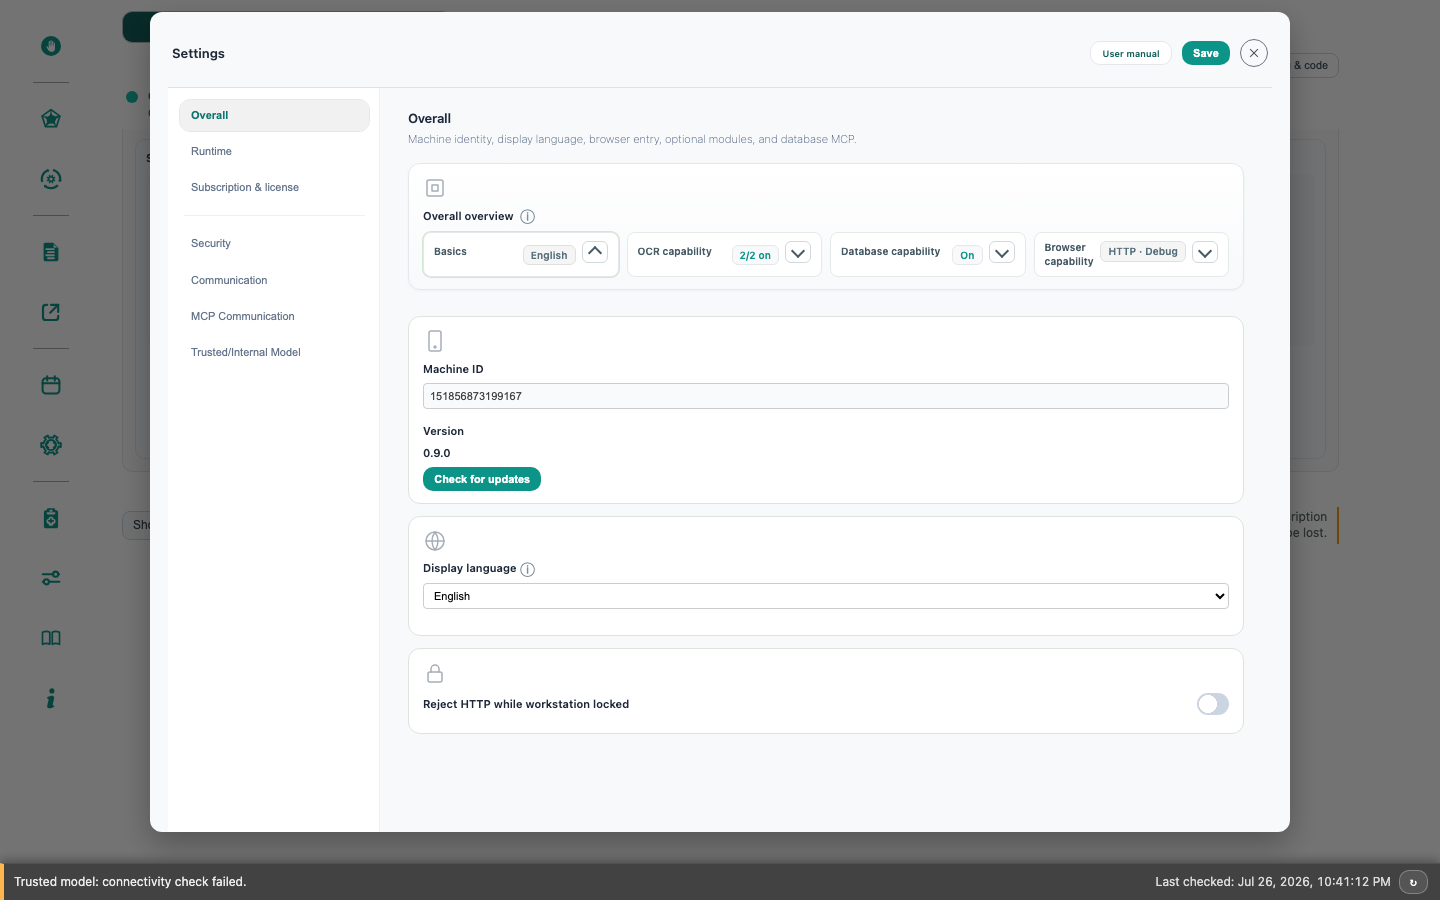
Open Settings from the Sidebar, then go straight to the goal below — you do not need every tab.
| I want to… | Go to |
|---|---|
| Change the interface language | Settings → Overall (or 总体 in Chinese) |
| Install or check a license | Subscription & license — §7.3 |
| Store passwords safely | Security → Key Vault — §7.1 |
| Connect Cursor / Claude / another assistant | Communication / MCP, then §10 |
| See monthly usage / quota | Sidebar → Health check & statistics → Usage — §7.2 |
| Prepare browser automation | Overall, then step 0 Prepare … browser when the UI asks |
| Turn the welcome wizard on or off | Overall — “Show welcome slides when opening the app” |
Open Settings from the Sidebar. Common tabs:
- Overall — language, browser automation readiness, and related runtime options. The Basics chip is language / machine identity; use Overall settings from the environment checklist to jump here for DB / OCR / OpenCV.
- Subscription & license — license status and upload when enabled.
- Security — Service API key, allowlists, path safety, Key Vault, what the AI connection may expose.
- Communication / MCP — how assistants connect to this machine.
- AI model — shared connection for business description, AI parameter extraction, code analysis, and AI post-run (separate from the design mode switch).
- Database tools — enable when offered; details in §11.
Usage: Sidebar → Health check & statistics → Usage.
Save when the header asks you to. Some security changes need a restart — follow the on-screen hint.
7.1 Security check & Key Vault
- Security check — after you install or generate a Skill, run the in-app security check (Settings / Skill tools as labeled). Prefer fixing warnings before you distribute the package.
- Key Vault — store passwords and secrets in Settings → Security → Key Vault. During AI design, ask the assistant to read from Key Vault instead of pasting secrets into prompts or recorded scripts.
- Service API key — optional lock for a few sensitive actions; if you enable it, put the same key in clients that ask for it.
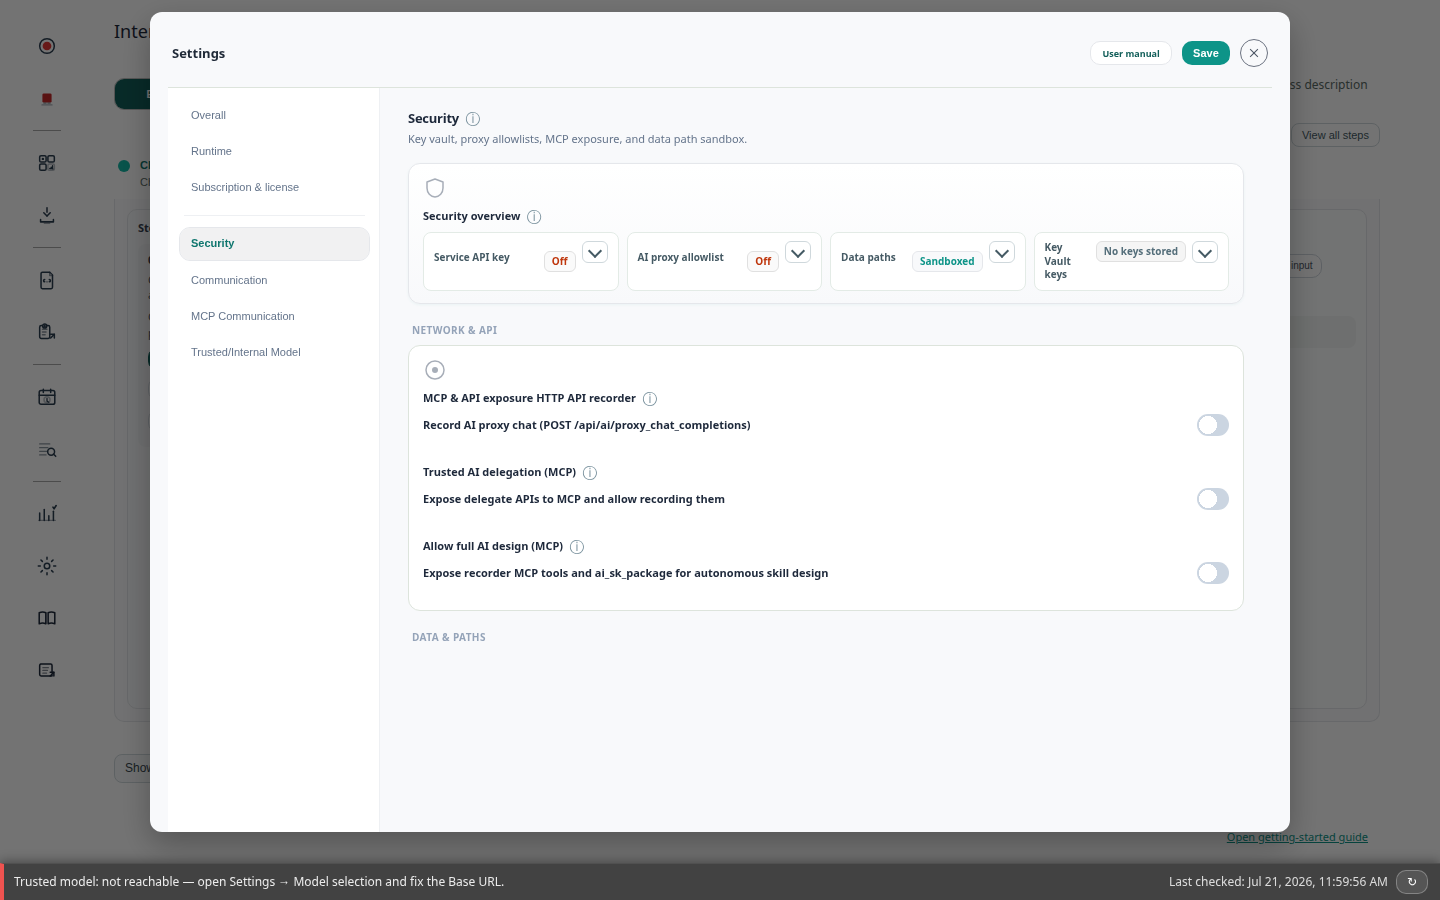
Never share screen recordings that reveal Key Vault values. Use Reveal only when alone.
7.2 Health check & Usage
Open Sidebar → Health check & statistics:
- Status / Advanced — green means ready; red/yellow items usually block recording or Skills. Fix those before long sessions.
- Usage — shows counts that follow the same rules as your monthly subscription quota (when licensed).
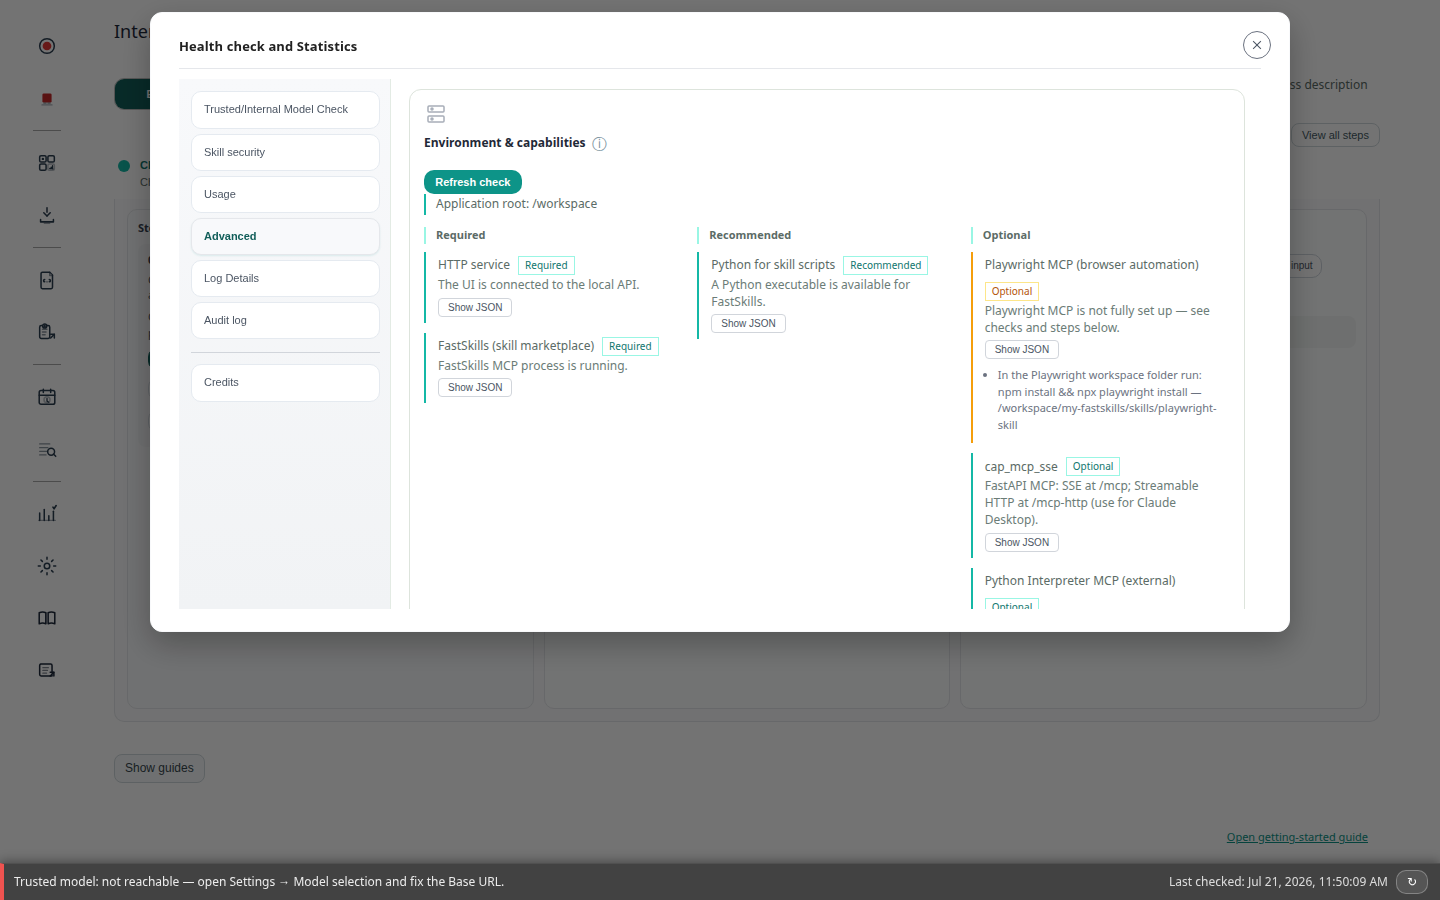
If Usage is near the limit, finish packaging and run offline Skills / executables where possible, or upgrade per your license channel.
7.3 Subscription & license
- Open Settings → Subscription & license.
- Check Current plan, Monthly limit, and Used this month (same counting idea as Usage).
- To upgrade: upload the
.jsonlicense file you received (Install license file → choose file → Upload). - Optional: Remove license returns you to the free tier limits shown in the UI.
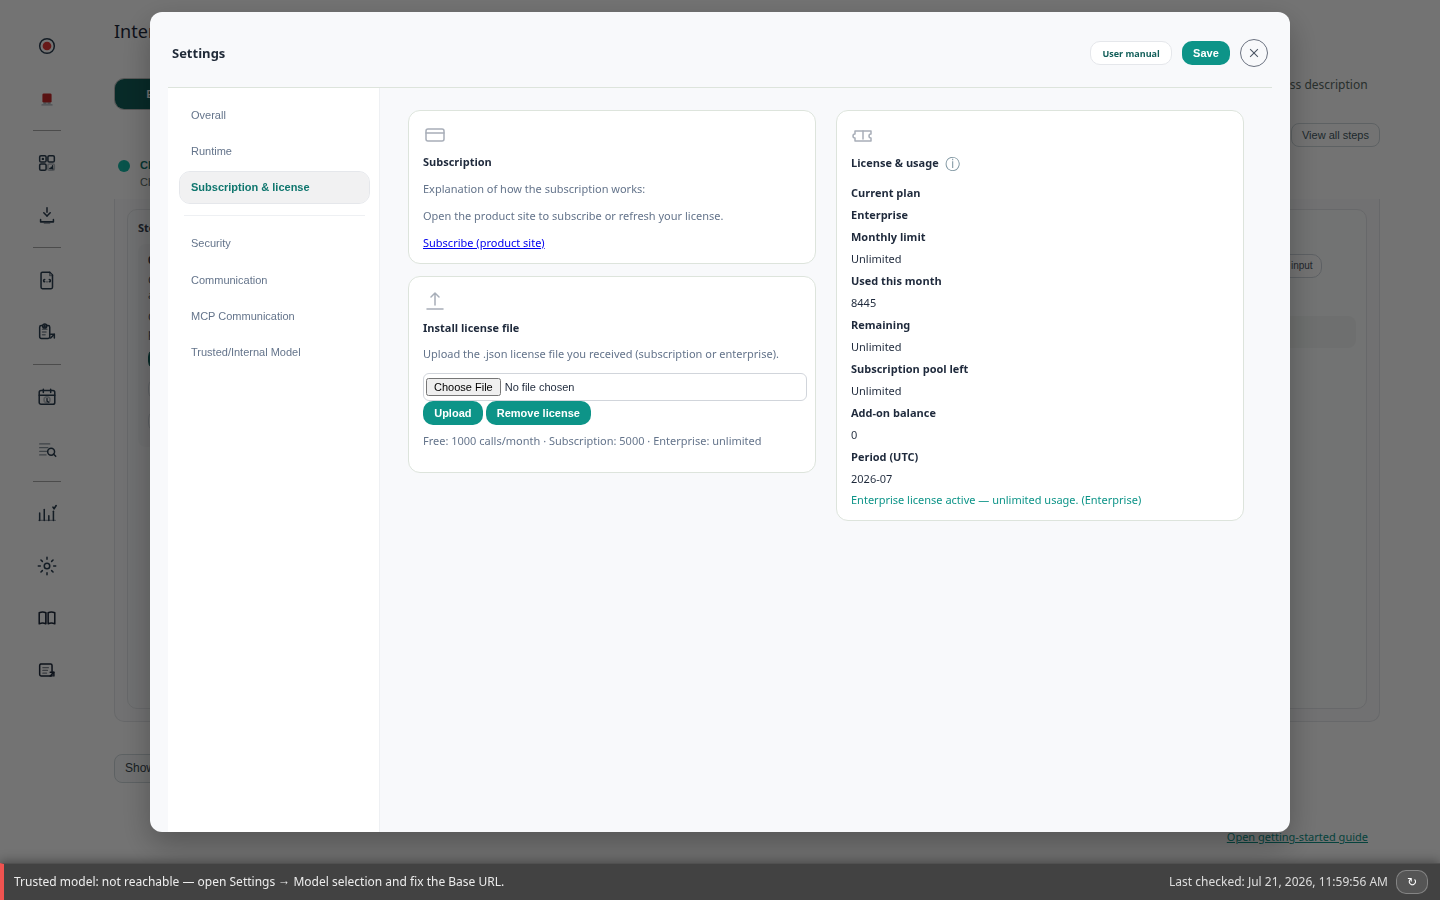
If a quota popup appears, finish packaging and run offline Skills/executables where possible, or install a higher-tier license. Subscribe/refresh links open the product site when offered.
Everyday8. How to use
Follow the Control Panel labels in order. Prefer these procedures over guessing buttons.
8.1 Main flow — steps 0 to 6
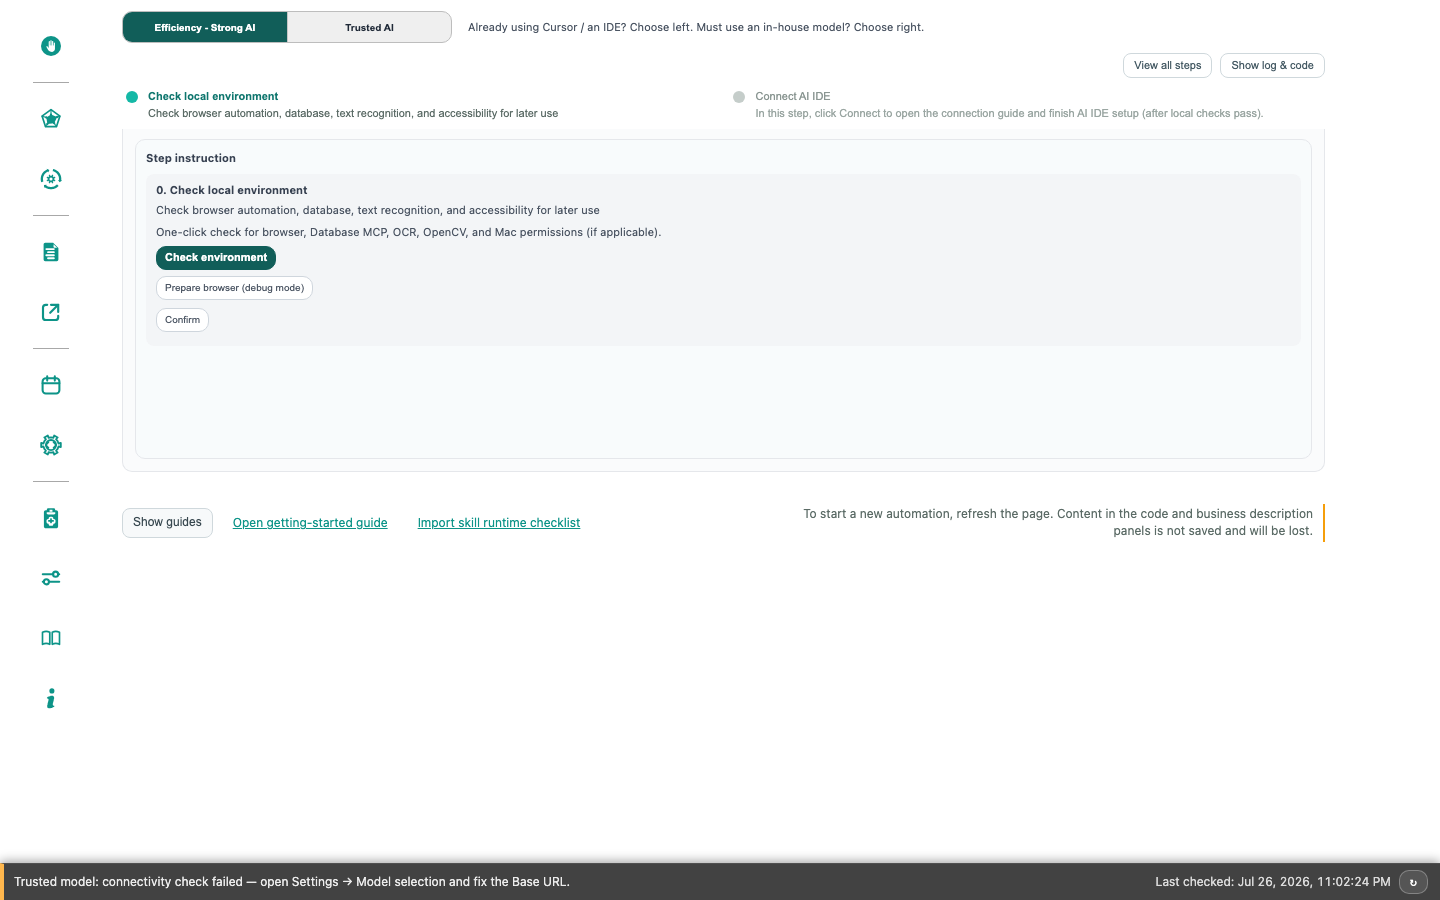
Record an automation with AI design, confirm it on this machine, then package a Skill.
-
Check local environment
Select 0. Check local environment, then click Check environment. Fix items marked red. When the UI asks for browser automation, use Prepare browser (debug mode) (or the prepare-browser control shown in your language). -
Connect an AI IDE
Follow the on-screen help for Cursor, Claude, or another client so the assistant can use your local tools. -
Start AI design
Click Sidebar Start AI design. When the recording overlay appears, perform the real task in your AI client. -
Stop AI design
Click Stop AI design. Wait until the code or specification panel updates. -
Run and confirm
In the code panel, click Run once. Read the operation log and confirm the result on screen. -
Generate a Skill
Open Sidebar Make skill, complete business context, and package the flow. -
Install and use (optional)
Install the Skill where you need it, then run it from the Control Panel or your connected assistant.
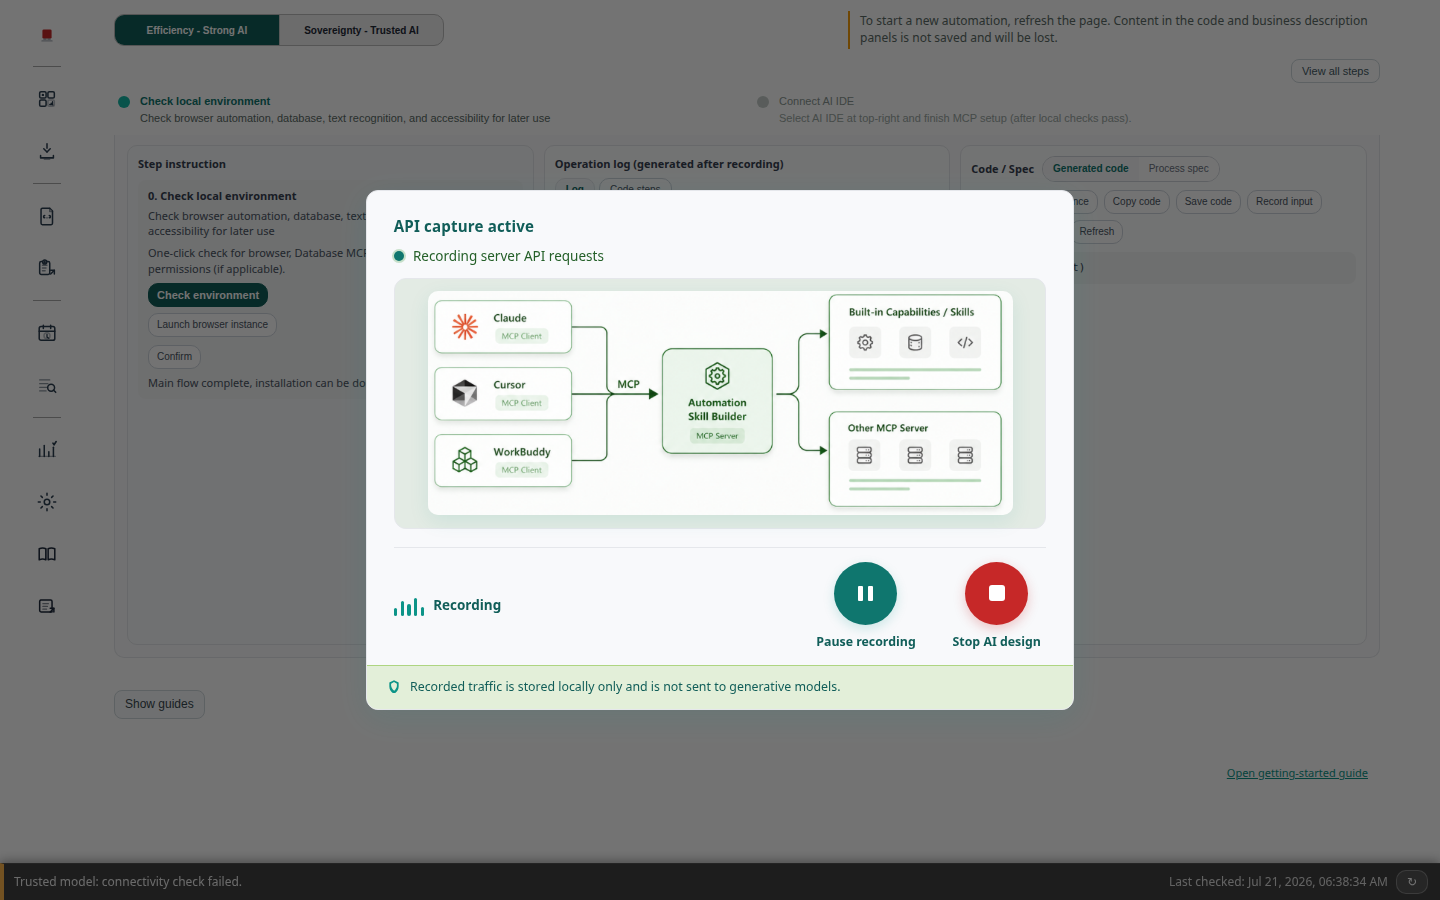
Tip: You can Pause recording without discarding the session.
8.1.1 What success looks like
After each main-flow step, look for these on-screen signals before you continue:
| Step | You should see |
|---|---|
| 0 Environment | Fewer red items after Check environment; optional items may stay skipped. |
| 1 Connect AI | On-screen connection steps completed, or Health check shows the assistant path as ready. |
| 2 Start AI design | Recording overlay / “recording in progress” dialog appears. |
| 3 Stop AI design | Overlay closes; code / specification panel gains content (or a generation-in-progress state finishes). |
| 4 Run once | Operation log shows new lines; the real app/window did what you expected. |
| 5 Make skill | Make skill finishes without an error dialog; a package or Skill entry appears where the UI says. |
| 6 Install (optional) | Skill is listed and can be started from the Control Panel (or your assistant). |
No signal? Use §12.0 or §8.11 Replay log instead of re-recording blindly.
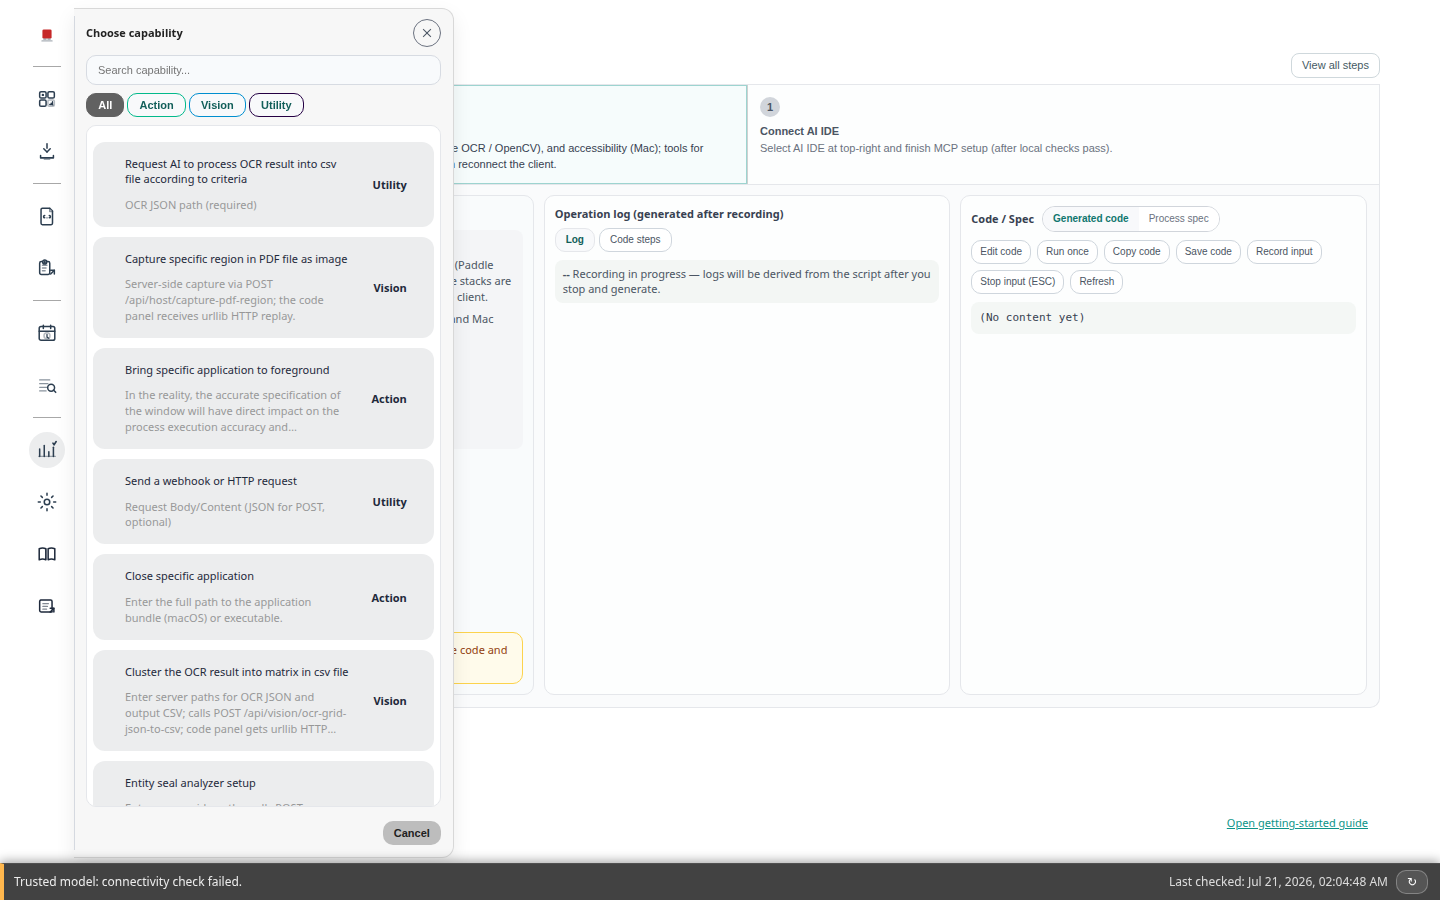
8.2 Use a Capability (picker)
Goal: run one ready-made action without a full recording session.
- Open the Sidebar Capability picker.
- Filter (All / Action / Vision / Utility) or search by name.
- Open a Capability, fill the form, and run it.
- Check the dialog, operation log, or output file.
8.3 Tutorial: Your first screenshot
Time: ~10 minutes · Need: Control Panel open
- Open the Capability picker and find Screenshot (or the equivalent capture action).
- Choose a region, or full screen if offered.
- Wait — first OCR-related runs may download models (§12.2).
- Confirm the preview or saved file.
macOS: blank captures usually mean Screen Recording is off — enable it, then quit and restart.
8.4 Find text on screen and click
Open the Capability picker → Vision, choose the OCR / find-text action, set the region and target text, then run. Prefer a small region so OCR stays fast.
8.5 Mouse and keyboard
Open the Capability picker → Action for move, click, type, and hotkeys. Follow the dialog (including any countdown before a click at the current cursor).
8.6 Schedule & timed runs
Two complementary options:
- In-app Schedule — Sidebar → Schedule. Turn on the master switch, add time windows (days + start/end), then Save. When a focus window is active, follow the on-screen banner. Restarting the server turns scheduling off for safety — turn it back on if needed.
- OS scheduler export — use Export OS scheduler file (sidebar / task export) when you want Windows Task Scheduler or macOS launchd to start a packaged executable on a calendar. Paste the full absolute path to the executable, choose the schedule, download the file, and install it with your OS tools.
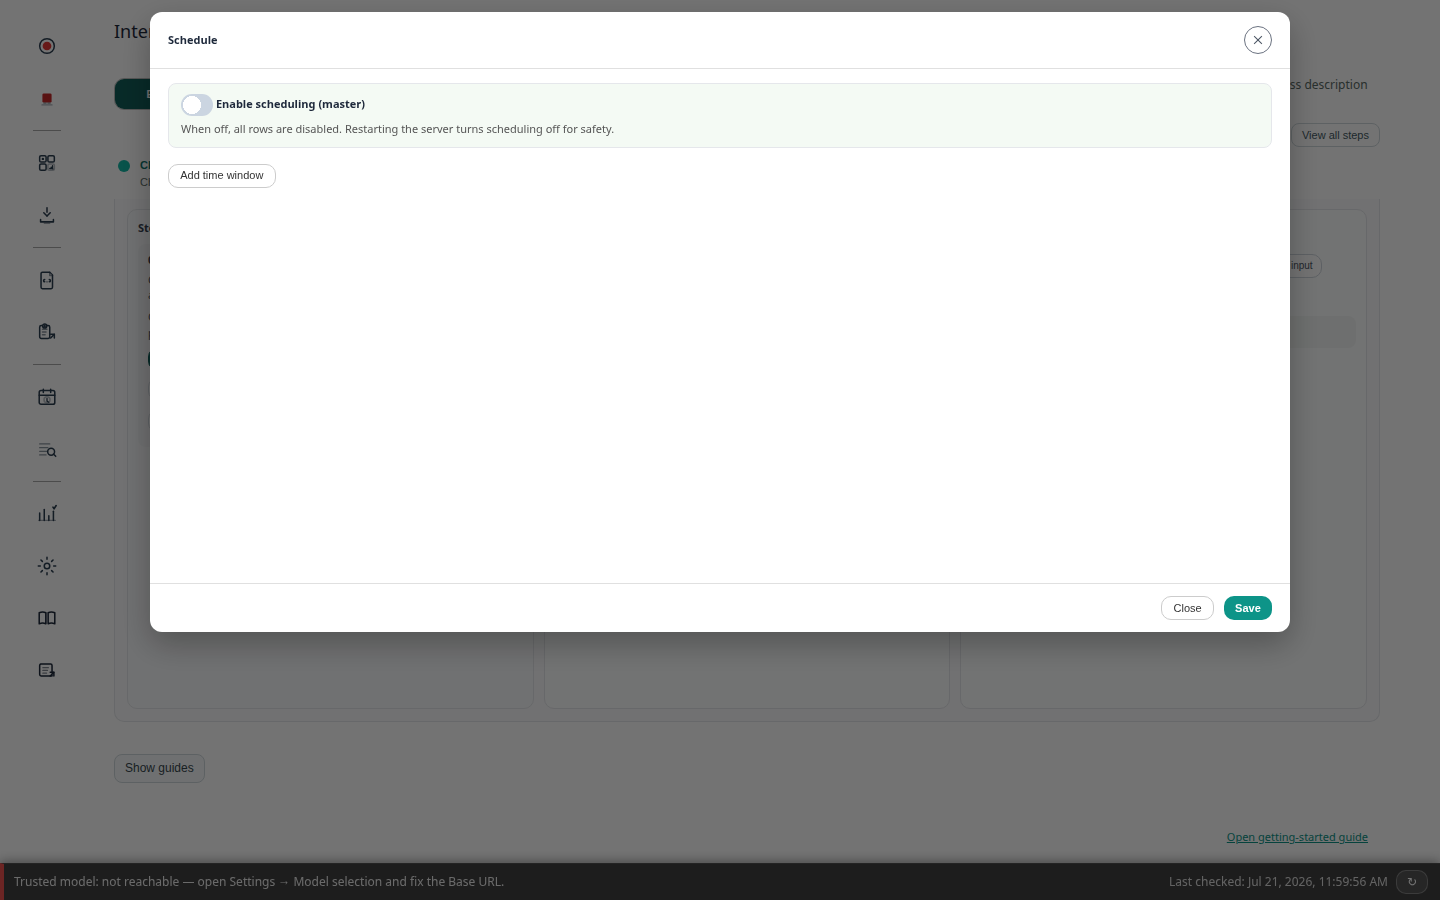
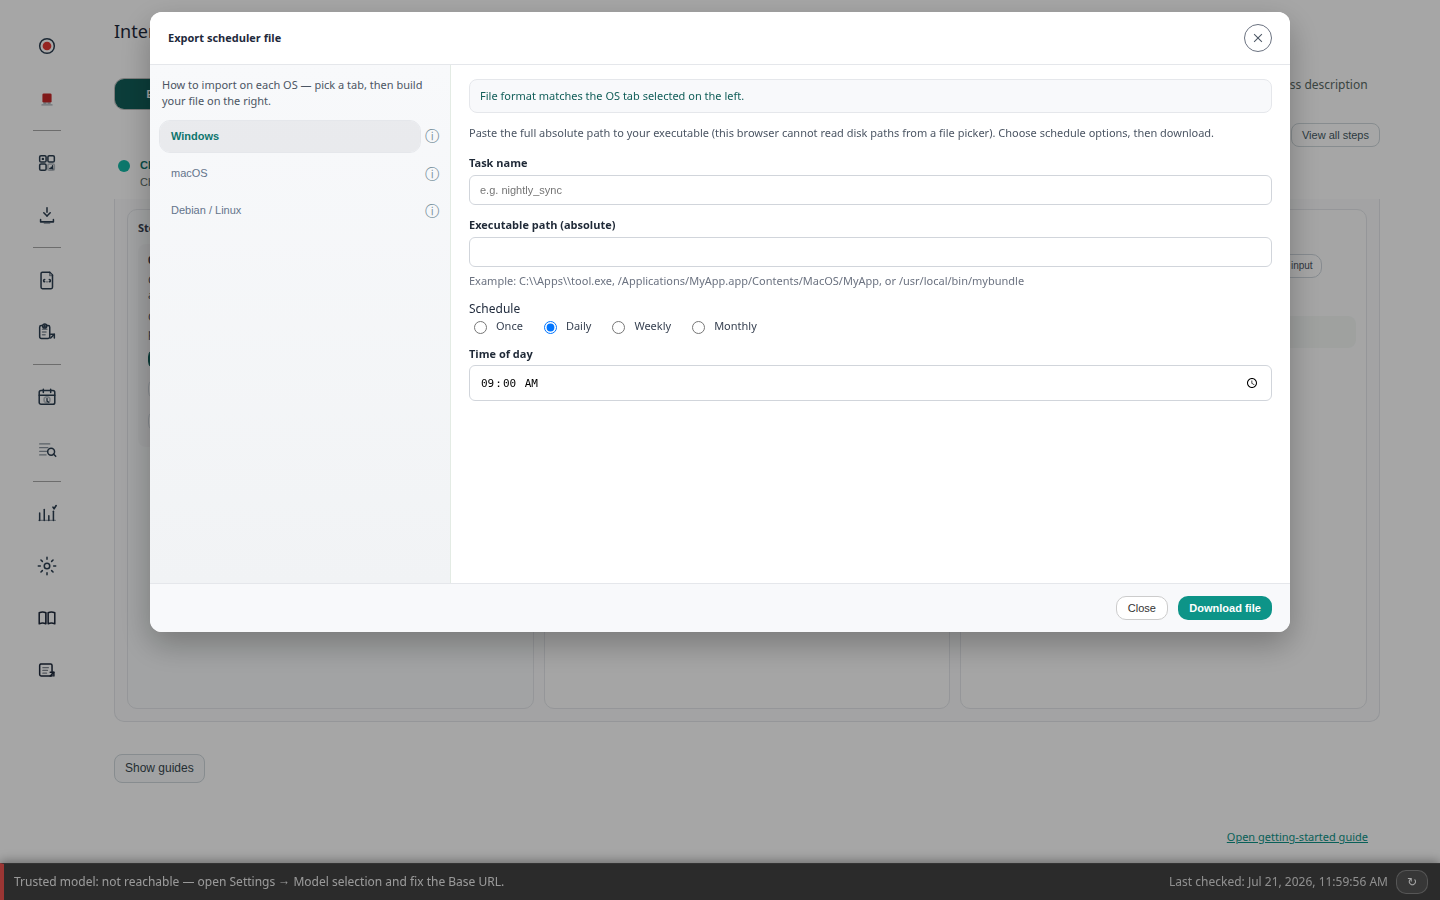
Scheduling runs the already packaged automation. Design/recording still needs the Control Panel and (usually) an AI connection.
8.7 Package & distribute
- Finish Run once and Security check on a machine that mirrors production.
- Primary path: open Sidebar Make skill, complete business context / packaging, and export the Skill ZIP (and a standalone executable when your build offers it). See §8.13.
- Skill — install into the Skills area on the target machine (or via MCP). The Automation Skill Builder app (or FastSkills runtime) must be available to list and run it.
- Executable — copy the packaged file to the target PC; runtime usually does not need an AI model. Keep the same OS family and similar display scale when the flow uses screen coordinates / OCR.
- Hand colleagues a short note: which window to open first, required permissions, and sample inputs.
Receiving a package from someone else? Use toolbar Import Binary (§8.8), then Run once and Security check.
8.7.1 Handoff checklist (give this to a colleague)
Copy or print this list with every Skill / executable you share:
- ☐ Which window or app to open first (exact title if possible).
- ☐ OS family, screen resolution, and DPI/scale — these are written into runtime_requirements.json at pack time; import the checklist on the target PC to compare (OS mismatch blocks; display mismatch is advisory).
- ☐ Permissions already granted on your machine (Screen Recording, Accessibility, …).
- ☐ Sample inputs (one document number, one Excel row, one test account that is safe to use).
- ☐ Before deploy: open the Skill’s runtime_requirements.json (or SKILL.md Runtime prerequisites) and confirm the target machine meets every required item — do not rely on a vague “same environment” note.
- ☐ On the target PC: open Automation Skill Builder → Import skill runtime checklist (next to Open getting-started guide) → enable anything marked not ready (OS match, browser automation when declared, Paddle OCR, OpenCV, Database MCP, Windows MCP, SAP, AI model, …) → restart if prompted.
- ☐ Whether they need the full Automation Skill Builder app, or only a packaged executable — follow the checklist (full app is required when OCR / DB / MCP / post-run AI is declared).
- ☐ Ask them to Run once and run a Security check before editing or redistributing.
Receiving a package? §8.8 Import Binary · §8.12 Install skill.
8.7.2 Import skill runtime checklist (target PC)
This is not “import / install a Skill”. Use it when a colleague sends you a Skill ZIP and you want to know whether this machine meets the pack-time requirements before you run it.
- On the Control Panel, next to Open getting-started guide, click Import skill runtime checklist.
- Choose
runtime_requirements.jsonfrom the ZIP (or choose the ZIP itself — the app looks for that file inside). - Read the list: Required · blocking must be ready; Advisory (often display/DPI) warns about possible click/OCR drift but does not block.
- Use the footer buttons to open the matching Settings, enable what is missing, restart if prompted, then Recheck.
- Install or run the Skill separately (Import Binary / Install skill). Closing the checklist does not install anything.
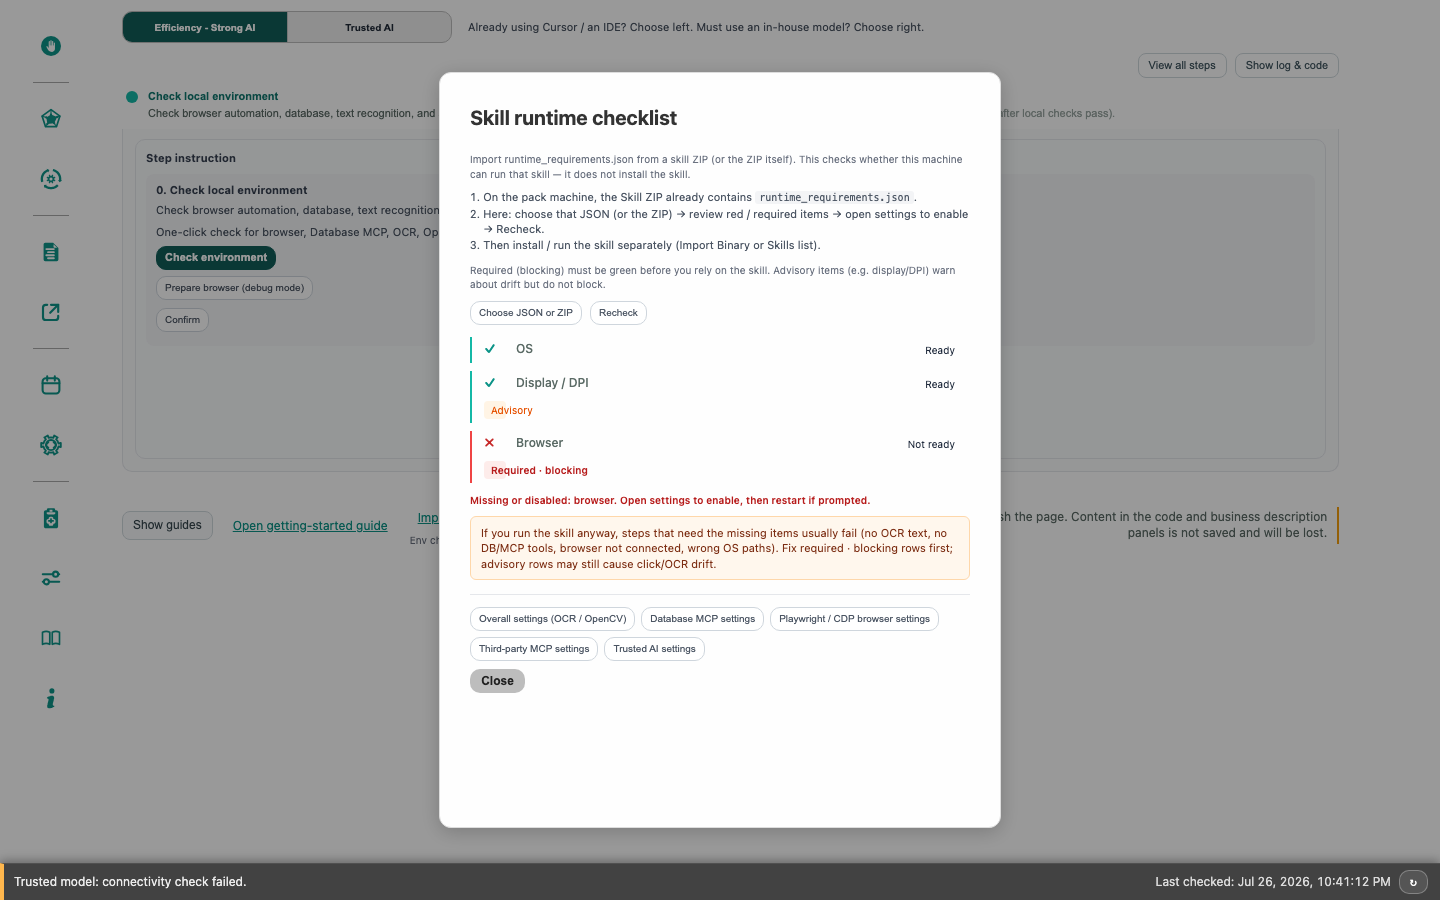
If required items stay red: running the skill anyway usually fails on those steps (no OCR, no browser session, wrong OS, missing MCP tools). Fix blocking rows first.
8.8 Project files — New / Open / Save
Treat each automation as a project you can move between machines:
- New Automation — start a clean workspace (empty code / specification).
- Open Automation — load a previously saved project from disk.
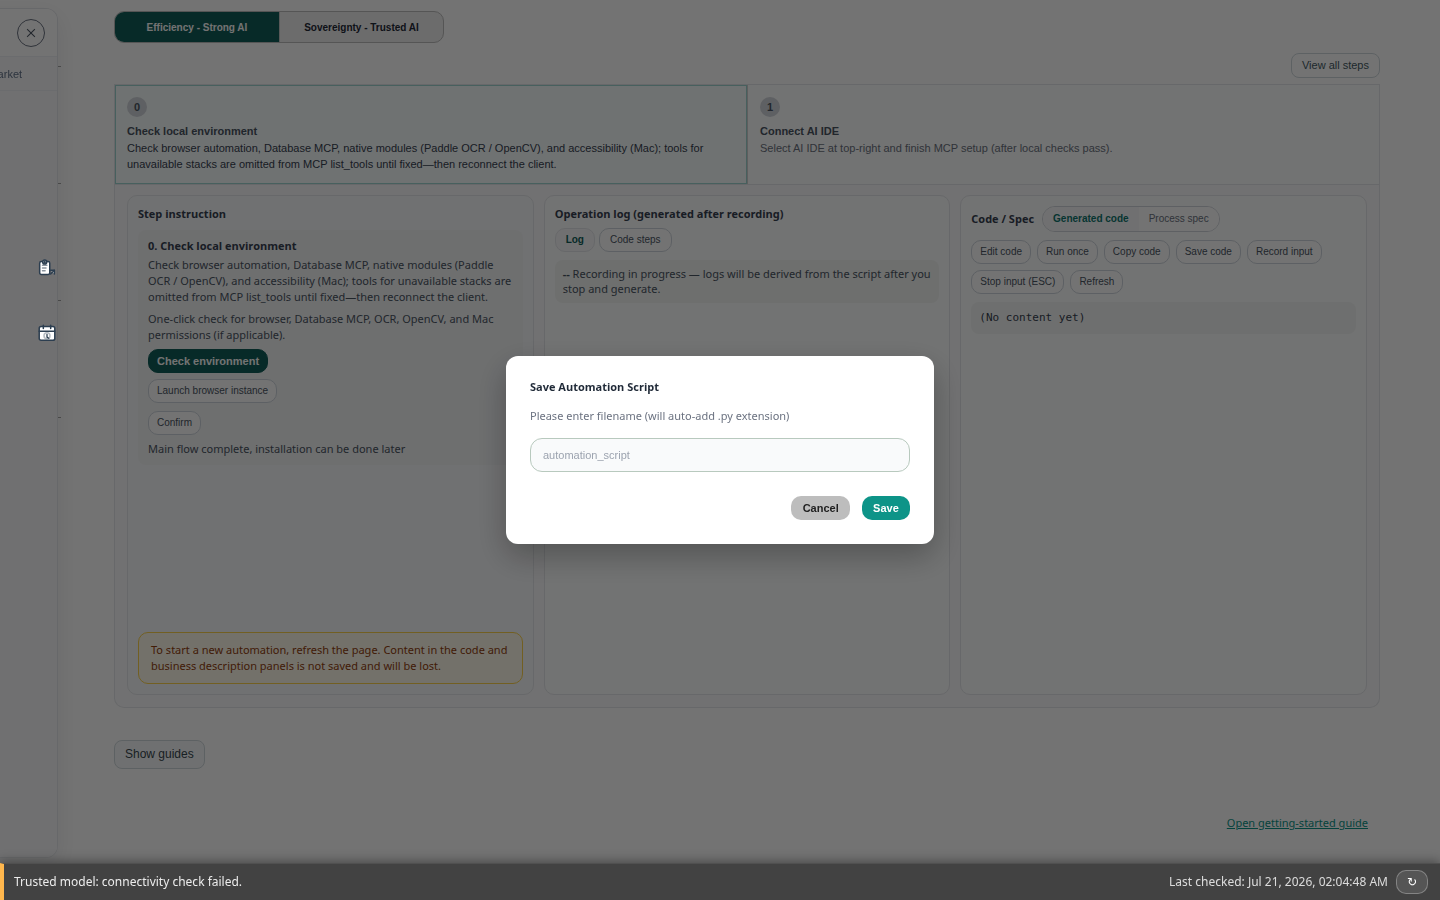
- Save Automation — write the current flow so you can resume later or hand it to a teammate.
- Import (when offered) — bring in an exported package/binary produced by this app.
Save before long AI design sessions. After Save, you can close the browser tab without losing the flow.
Import Binary — bring in a package previously exported from this app (or a teammate’s export). After import, open the project, Run once, then Security check before you edit or redistribute.
8.9 Classic recording vs AI design recording
| Control | Use when | Result |
|---|---|---|
| Start / Stop Recording | You (or a script) drive the steps yourself and want a capture without an AI IDE in the loop | A recorded trail you can review and turn into replay / Skill |
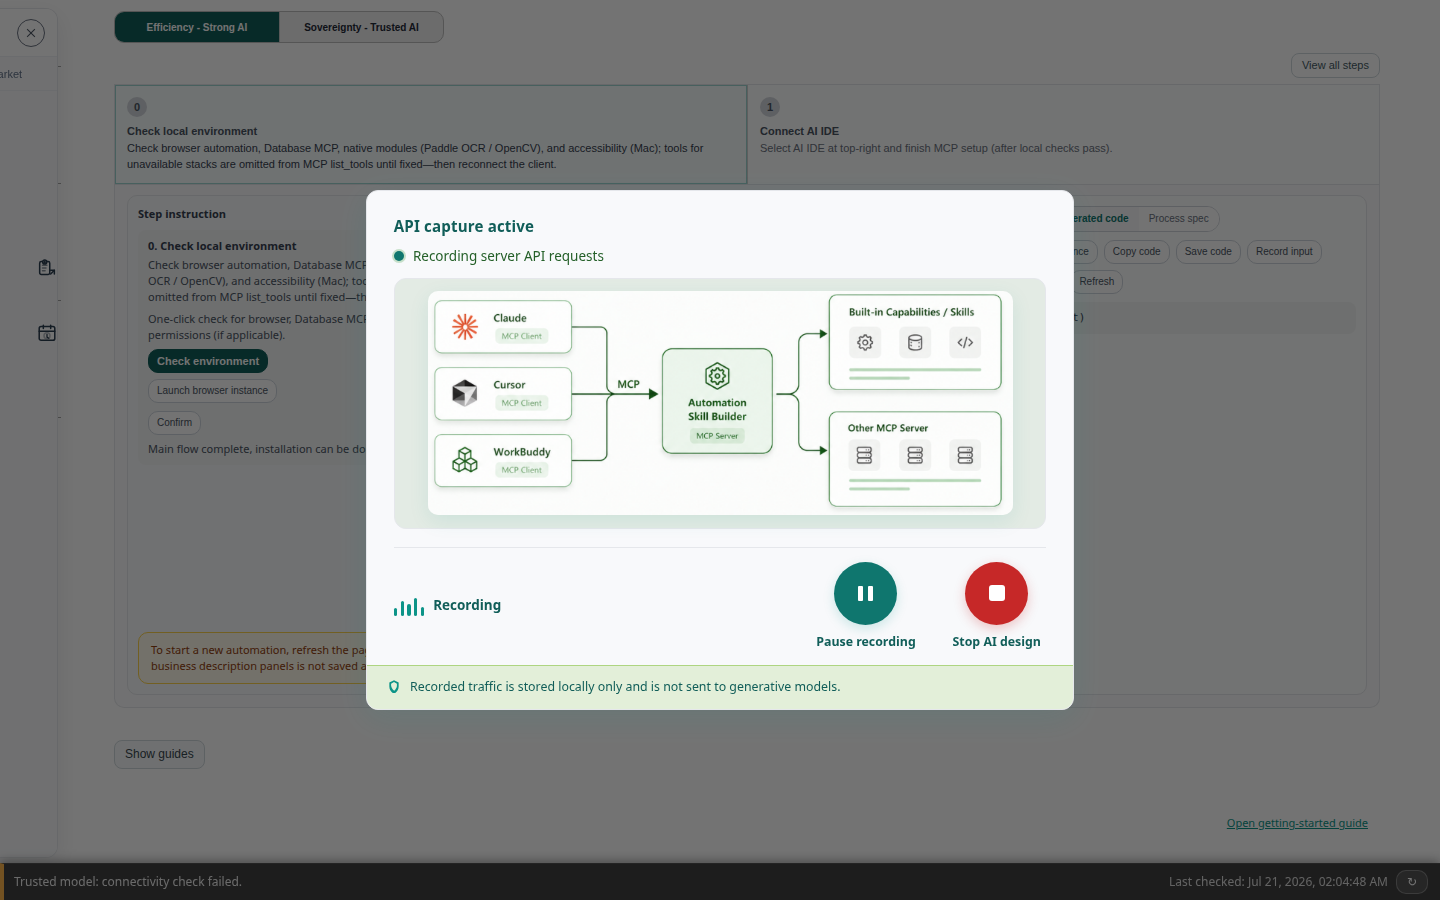
| Start / Stop AI design | An AI assistant operates tools through this app (MCP) while you describe the job in natural language | Same packaging path afterward — usually faster for desktop/enterprise segments |
Both paths still need environment checks (§8.1 step 0). Prefer AI design when the assistant can click/OCR for you; prefer classic recording when you must demonstrate a fragile UI by hand.
8.10 Code panel actions
After recording, the code / specification panel is your editing surface (main view is often a read-only preview — use Edit code to change it in a dialog).
- Run once — verify the current script on this machine.
- Security check — scan the Python in the panel before you share or package it.
- AI-assisted revision — extract parameters and rewrite with your connected model.
- AI Code Consolidate — tidy or merge generated code when the panel has grown noisy.
- Save code (when shown) — persist the panel contents into the project.
Run once → Security check → Save is the safest order before §8.7 packaging.
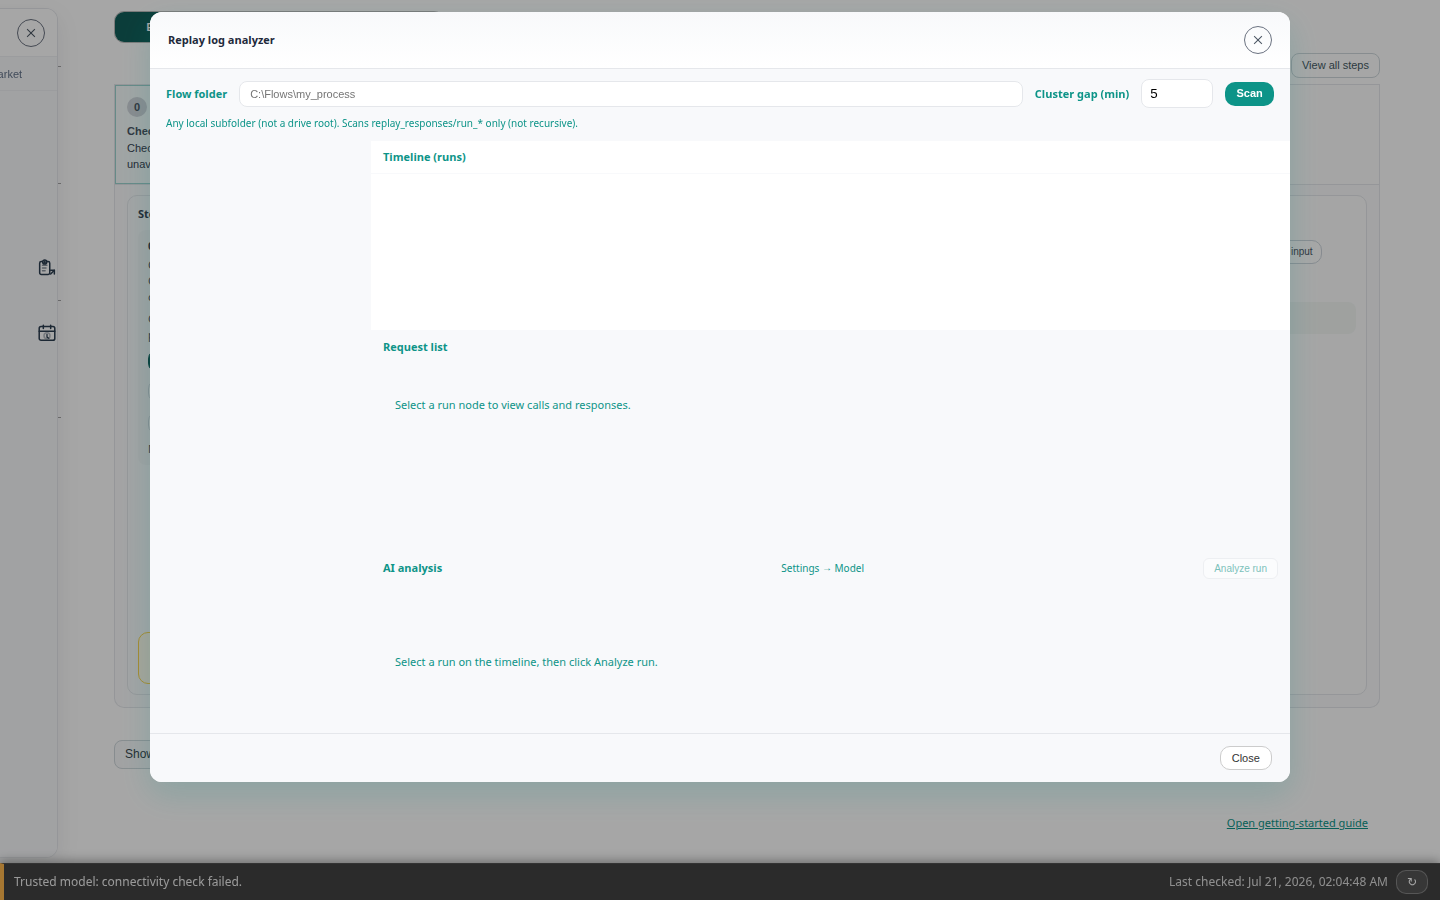
8.11 Replay log analysis
When Run once fails or a Skill behaves differently on another PC:
- Open Sidebar → Replay log (analyzer).
- Point it at the flow folder / replay responses the UI asks for.
- Find the first failing step (wrong window, missing text, timeout).
- Fix that step (re-record a segment, adjust waits, or change OCR region) — then Run once again.
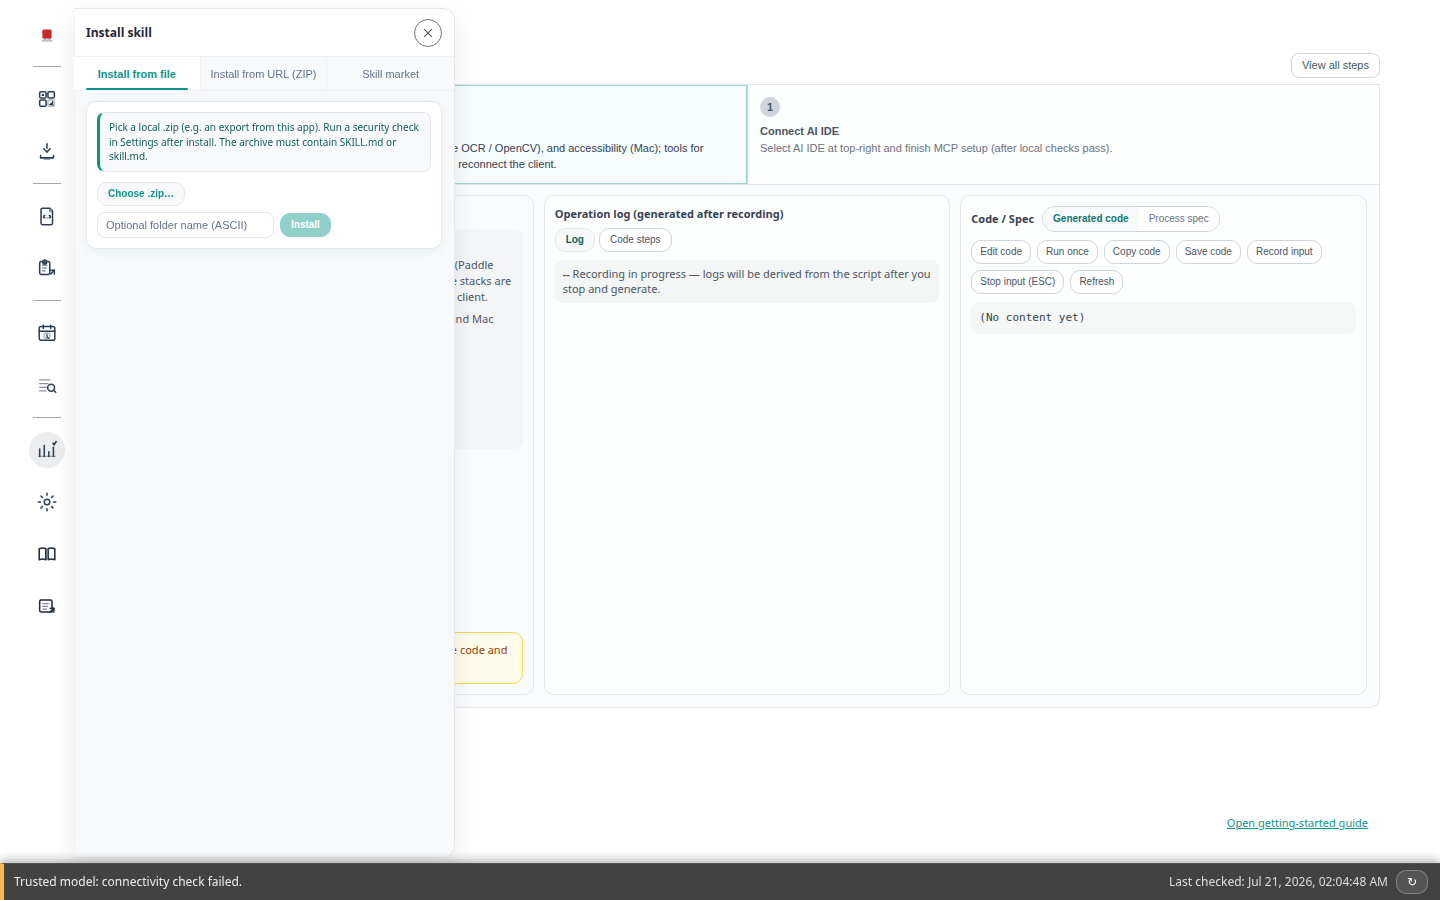
8.12 Install a Skill (market / ZIP / URL)
Open Sidebar → Install skill (flyout):
- Catalog / market — search by keyword, expand a row, install. Then run a security check in Settings.
- Local ZIP — pick an archive that contains
SKILL.md/skill.md(for example an export from this app). - HTTPS URL — paste a direct link to a ZIP (for example a GitHub branch archive). Same
SKILL.mdrequirement.
Only install Skills you trust. After install, list and run them from the Control Panel or via a connected assistant.
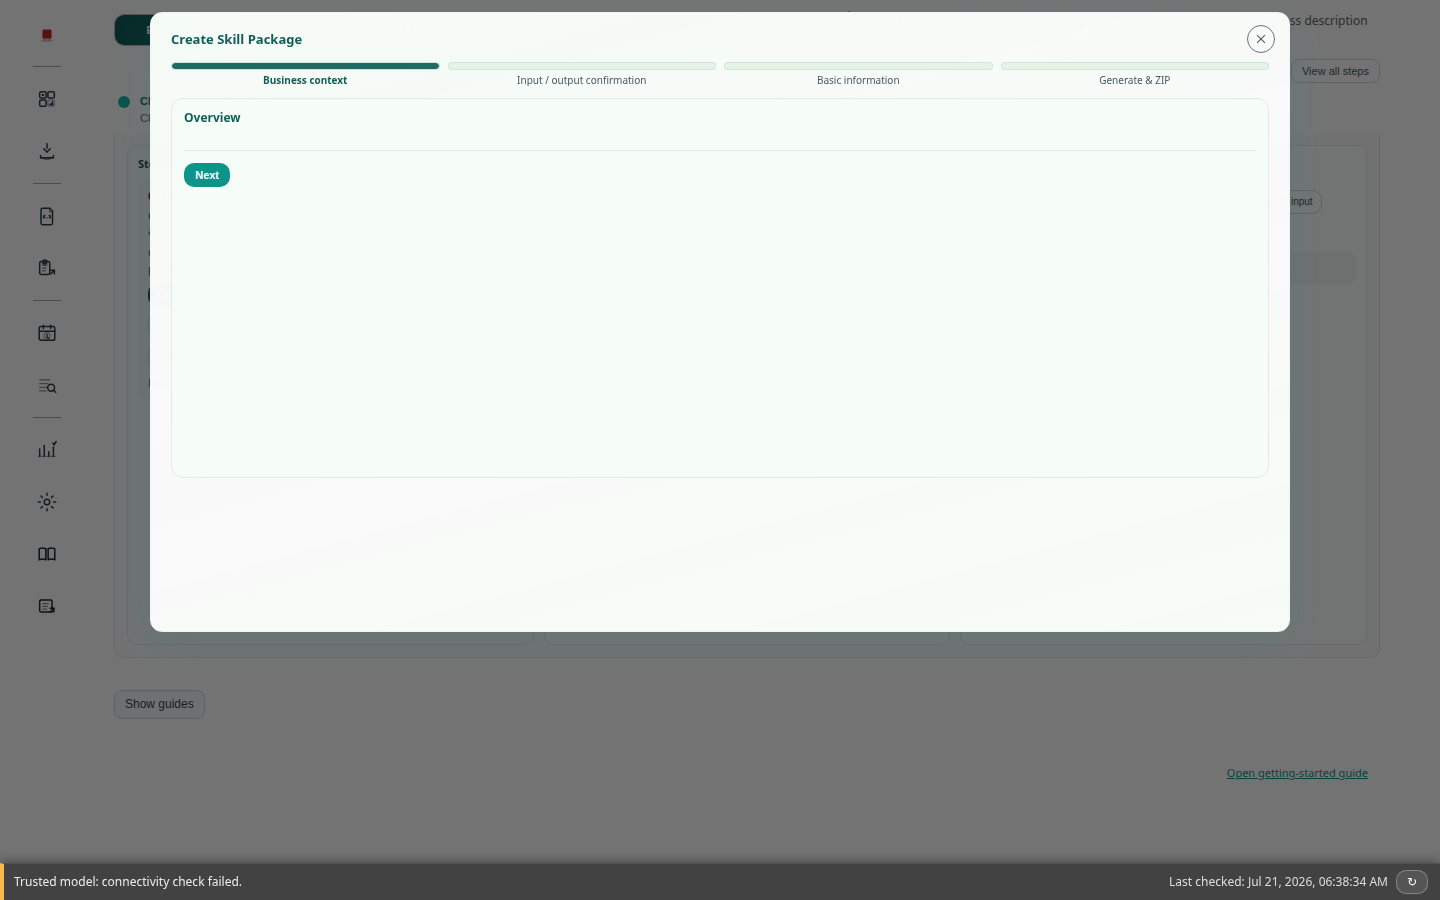
8.13 Make skill (primary packaging path)
- Finish an AI design session (Start / Stop AI design) and confirm Run once.
- Open Sidebar Make skill — fill business-process context, review parameters, then build the Skill package.
- Export / save the package from the Make skill wizard, then continue with §8.7 to hand it to teammates or install it.
Legacy Sidebar entries Create Skill Package and AI design replay → Skill stay hidden by default. Day-to-day packaging uses Make skill only.
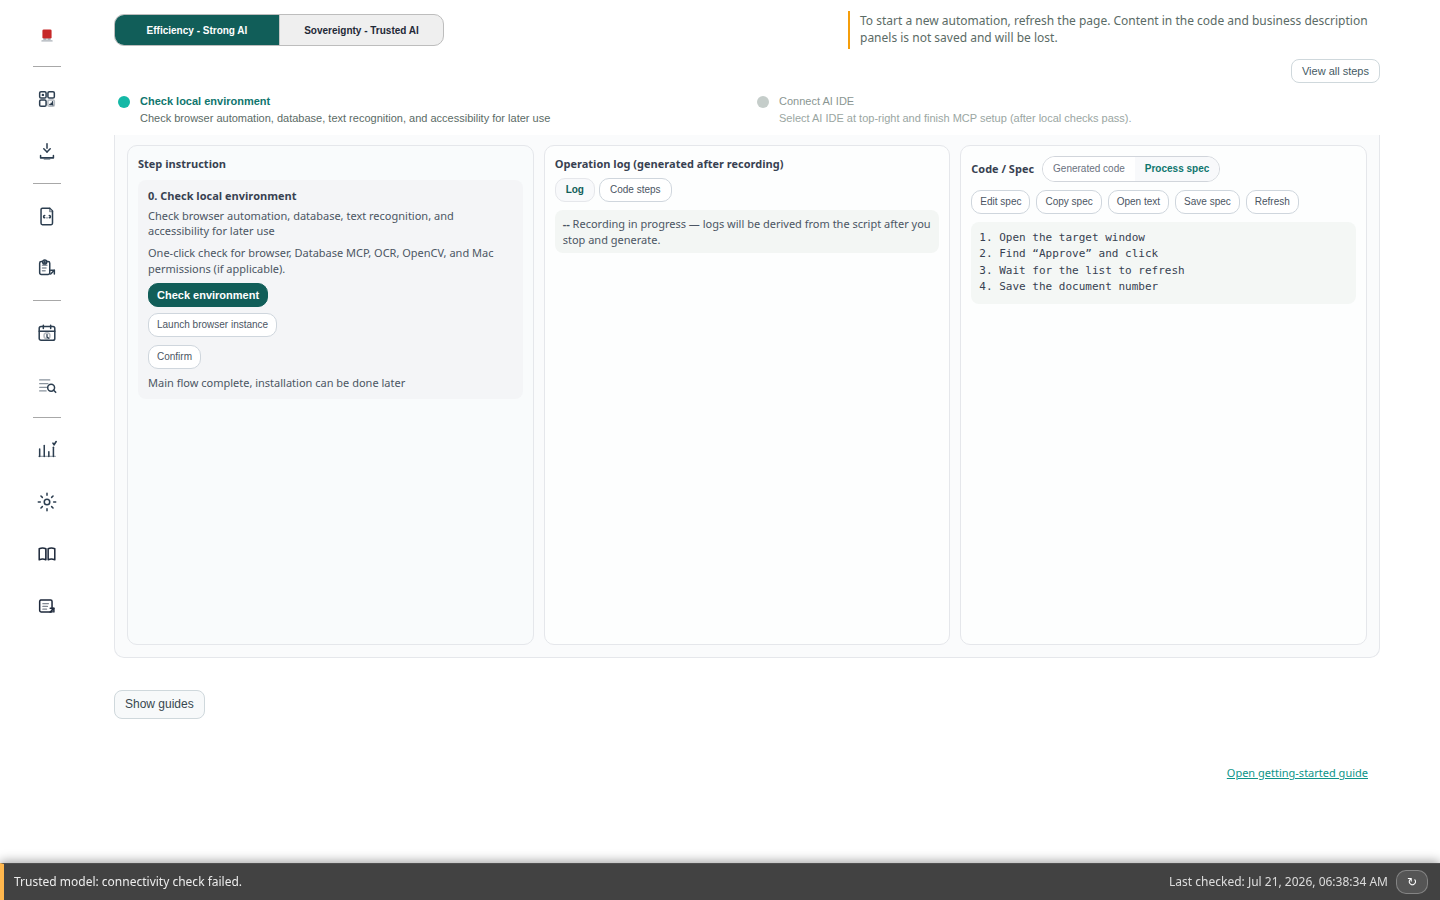
8.14 Process specification
Some flows keep a human-readable process specification in the Code / Spec column — use the tabs to switch between generated code and the readable steps:
- Edit Process Specification — adjust step descriptions manually when the narrative should stay clear for reviewers.
- Sort specification — put steps back into logical order after edits.
Use the specification when handing work to another person; use the code panel when you need an exact replay. Keep both in sync after major re-records.
8.15 Capability examples — email & files
Beyond screenshot / OCR / mouse (§8.2), open the Capability picker for ready-made utilities:
- Email (SMTP / IMAP) — configure the server under Settings → Security / Communication (Email tab). Use Send test email / receive-test controls there, then run send/receive Capabilities from the picker when you automate mail steps.
- File & folder utilities — search the picker for file/copy/move/read actions your build lists; fill paths in the dialog and confirm the result in the operation log.
- Favorites — star Capabilities or Skills you reuse, then open them from the favorites panel (show panels via §6.3 if hidden).
Exact Capability names follow your language and build. Prefer the in-app picker search over memorizing labels.
8.16 Task: send a test email
Goal: prove mail settings work, then reuse send/receive from the Capability picker.
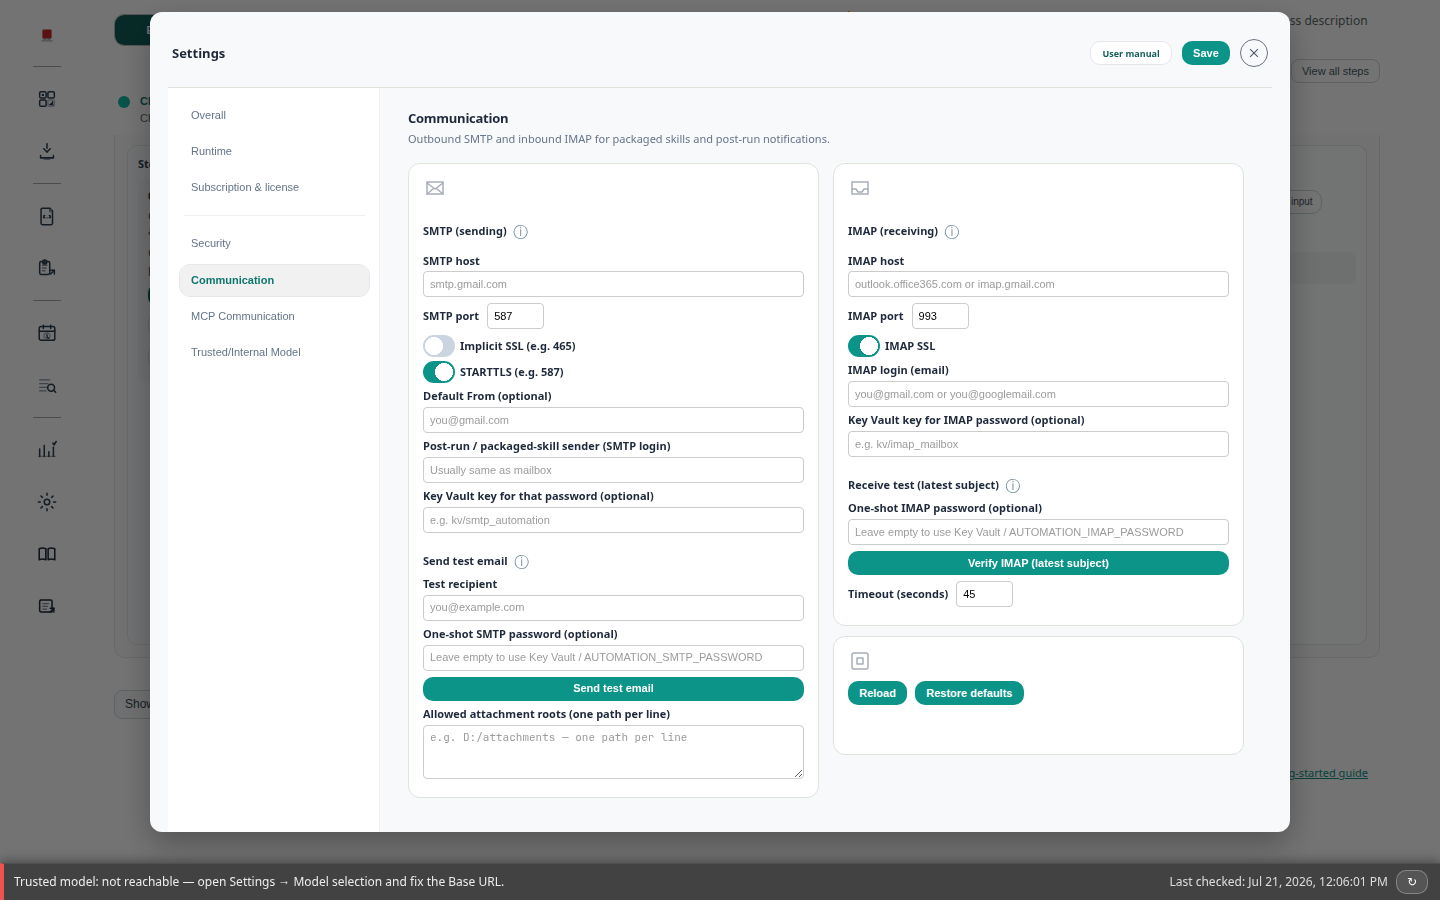
- Open Settings → Security / Communication (Email tab) and fill the server details your provider gave you.
- Use Send test email (and receive-test if shown). Confirm the test arrives in the inbox you expect.
- Open the Sidebar Capability picker, search for send/receive mail actions, fill the form, and run once.
- Check the operation log. Save the project if you will reuse the steps — §8.8.
Put passwords in Key Vault (§7.1), not in the process specification text.
8.17 Task: find on-screen text and click
Goal: click a visible label without writing code.
- Bring the target window to the front and keep a fixed size.
- Capability picker → Vision → OCR / find-text action.
- Select a small region that contains the label; type the exact text; run.
- Confirm the click landed correctly. If it missed, shrink the region or re-check spelling — §8.4.
8.18 Task: run the same step for many rows
Goal: one inner action × many Excel/CSV rows without one giant recording.
- Record and confirm the inner action once with sample values (§8.1).
- Package it as a Skill or executable with clear inputs (§8.13 · §8.7).
- Use an outer list (Excel/CSV) as described in §9.8 — do not paste hundreds of rows into one recording session.
- Deepen recording, browser, and Skills (§9)
- Connect an AI assistant (§10)
- Fix common symptoms (§12.0)
Advanced9. Record, browser & skills
Go deeper on recording, browser automation, and Skills after you finish the main flow (§8.1).
9.1 AI design recording
- Finish step 0 checks (and prepare a CDP browser if needed).
- Sidebar → Start AI design. Confirm recording is active.
- In your AI IDE, perform the real task.
- Optional: Pause recording, then continue.
- Stop AI design → wait for the code panel.
- Use Run once / Security check / Save code as needed, then package a Skill (steps 5–6).
9.2 Browser automation
In Settings → Overall, enable browser automation when offered. From step 0, use Prepare browser (debug mode) if the page says DevTools is not reachable.
9.3 Skills & FastSkills
Use Sidebar Skill tools to create, install, or open a Skill. When FastSkills is healthy, list and run Skills from the Control Panel or from a connected AI assistant.
If Skills fail to start offline: §12.5.
9.4 AI recording for different desktop apps (.exe)
Many enterprise flows live in installed desktop apps (Windows .exe, macOS apps) — not only in the browser.
Use the same AI design recording loop as §9.1, but prepare each target app carefully.
Goal: record one app (or one segment of an app) with natural-language prompts, then package a Skill or standalone executable you can run without AI at runtime.
- Permissions — on macOS grant Accessibility / Screen Recording (and related) first — §12.1. On Windows, run as a normal interactive desktop user (not a locked session).
- Open the target app — launch the real
.exe/ app window you will automate (for example an IM client, ERP client, or office tool). Bring it to the front. - Stabilize the window — set a fixed window size (or maximized) before recording. Changing DPI/scale mid-way makes clicks drift across machines.
- Connect AI & start AI design — finish §10, then Sidebar → Start AI design.
- Prompt like an operator — in Cursor / Claude, describe the steps a person would take (wait, click the search box, paste from clipboard, press Enter, wait for the list). Prefer plain language over “recording jargon”.
- One app / one segment per session — login, list export, approve, and countersign are usually separate recordings. Different products should not share one long fragile session.
- Stop → Run once → Make skill — confirm on this machine, then open Sidebar Make skill to package. Runtime can be a Skill or a packaged executable, depending on what your build offers.
Example prompt shape (desktop approval-style flow):
“Start AI design. Wait 2 seconds. Click the document search box, select all, paste the document number from the clipboard, press Enter, wait until the first result appears, open it… Stop AI design and save this segment.”
Product case study (desktop app segmented into multiple executables): From 1–2 weeks to 1 day — enterprise approval workflow.
9.5 Windows, controls, and how the AI should click
Desktop apps rarely expose neat web selectors. Tell the assistant how to find each control:
- Visible text (OCR) — “find the on-screen text Approve and click it.” You can also practice the same action via Capability picker → Vision (§8.4). Prefer a smaller screen region for speed.
- Mouse & keyboard — move/click/type/hotkeys via Capability picker → Action (§8.5), or ask the AI to do the same during recording.
- Clipboard paste for CJK / complex text — copy the value first, then paste (Ctrl+V / Cmd+V) into the field. Direct typing often fails in desktop apps.
- Tab navigation — when a button moves because a text box grows, prefer a few Tab presses over hard-coded coordinates.
- Select-all copy — if a list supports Ctrl+A / Cmd+A, copy once instead of building a scroll-and-capture loop.
- Focus first — always activate the correct window title before clicking; otherwise clicks land on the wrong app.
For browser forms (not native exe), the same “operator language” pattern still applies — see From dynamic Excel to repeatable line entry.
9.6 Split long flows into Skills / executables
Long desktop jobs (hundreds of steps, branches, batch sizes that change) should not be one giant recording. Follow the product-blog pattern:
- Record the inner action once — the smallest repeatable unit (add one row, approve one document, export one file) with sample values.
- Parameterize & package — turn sample values into Skill / executable inputs.
- Outer loop separately — another recording or script reads a list (Excel/CSV) and calls the inner Skill once per row / document.
- Branches as separate segments — record the happy path first; describe or separately record failure / yellow / red paths, then combine with clear rules (do not force the model to invent business policy).
Practical refactor notes (loops, if/else, MCP recording while the AI operates): From linear recording to loops and branches.
Remember: AI helps you design and capture; packaged Skills / executables run deterministically on the machine without calling a model at runtime.
9.7 Choose a build method
For the same business goal (filter a list, open an item, run a fixed sub-flow), teams usually pick one of three paths:
- Method 1 — AI writes code — describe the flow; the model drafts Playwright/Python. Good if your team already debugs code and accepts more iteration.
- Method 2 — Inner Skill / exe + outer loop — record the small inner action once, parameterize it, then record or script an outer list loop that calls it. Best when the same inner step appears in many places or nests deepen.
- Method 3 — Full MCP recording, then refactor — Start AI design, let the assistant operate once, stop, then ask AI to add loops/branches/data sources to the linear script. Often the fastest way to get a verified first run.
Deeper comparison and ROI notes: Three build methods and ROI · From linear recording to loops and branches.
9.8 Batch from Excel / CSV
- Decide the loop boundary: navigation/save stay outside; “add one row / process one document” stays inside.
- Record the inner step with sample values written like an operator (clipboard paste, Tab, short waits).
- Package so sample values become parameters (product, qty, price, document id, …).
- Outer automation reads Excel/CSV and calls the Skill / executable once per row.
Walkthrough: From dynamic Excel to repeatable line entry.
9.9 Branches & failures
- Record the happy path first.
- Describe the other branch in plain language (“if a red error bar appears, close it, log, continue”) — or record that branch separately and merge at the fork.
- Tell the model how you detect the branch (visible text, missing button, file flag) — do not leave business policy to guesswork.
- Add waits where the UI is slow; recording order is not the same as “how long we waited.”
9.10 Browser vs desktop (.exe)
| Choose | When | Tips |
|---|---|---|
| Browser (CDP / Playwright) | Web apps, SaaS admin UIs, pages you can open in Chromium | Prepare browser (debug mode) from step 0; prefer stable on-page structure |
| Desktop app | Installed clients (IM, ERP, thick clients) without a usable web UI | Fixed window size; OCR / clipboard / Tab; see §9.4 |
| Mix | API or Excel outside + GUI clicks inside | Split segments (§9.6); keep secrets in Key Vault |
- Connect an AI assistant (§10)
- Package for others (§8.7)
- Desktop pitfalls checklist (§12.7)
Advanced10. Connect an AI assistant
Let Cursor, Claude, or another assistant use tools on this machine while you design and record.
- Keep Automation Skill Builder running and open the Control Panel.
- Open Settings and complete the Communication / MCP steps shown for your client.
- Copy the connection details from the UI into the assistant or IDE when asked.
- Return to step 1 of the main flow and verify the connection from the step help.
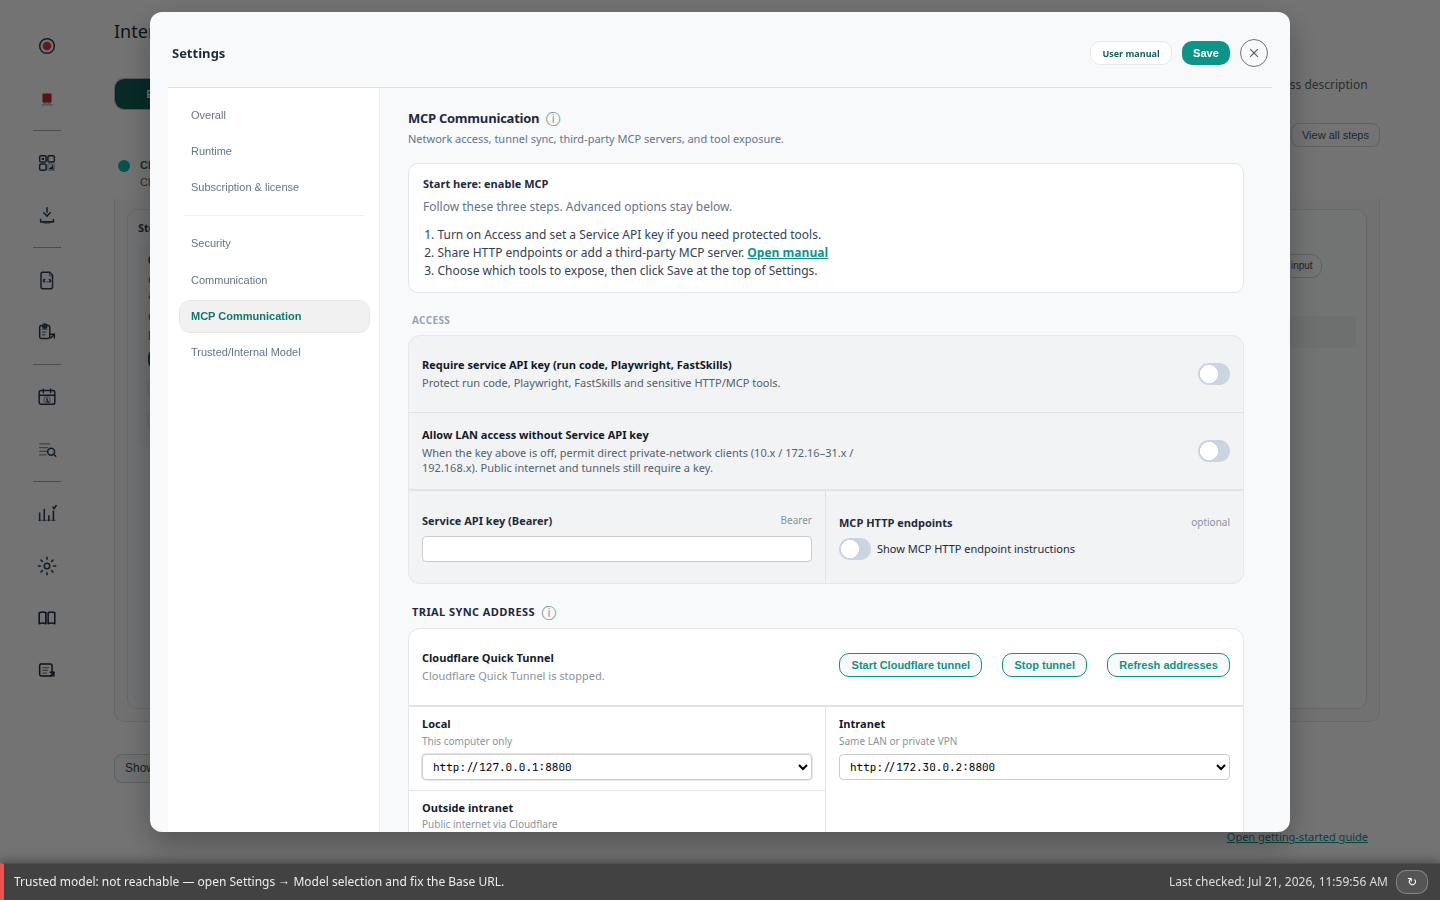
10.1 Which tools the assistant can see
In Settings, you can choose which tools are exposed to the assistant. After changes, follow the on-screen hint — a restart is often required.
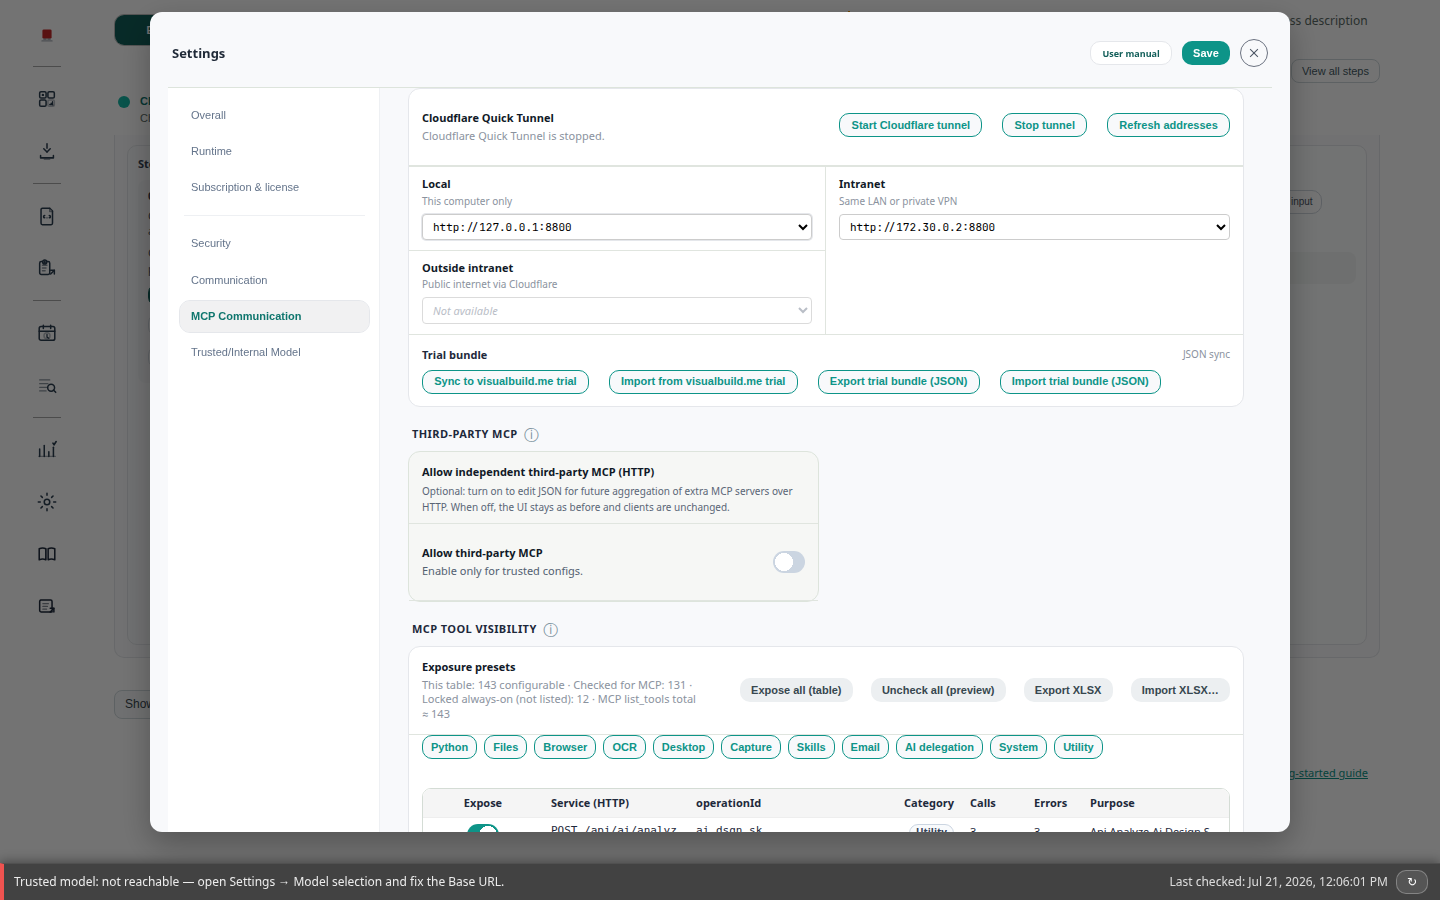
Fewer tools = a clearer assistant and a smaller attack surface. Prefer presets when the UI offers them, then tweak individual checkboxes.
10.2 Monthly quota and Usage
With a subscription license, many automation actions count toward a monthly limit. Open Sidebar → Health check & statistics → Usage to see the same counters.
10.3 VS Code, OpenRouter & other assistants
Once MCP is enabled in Settings, the same local tools can appear in more than one client:
- VS Code / Cursor / Claude Desktop — paste the connection details from Settings into that client’s MCP configuration, then restart the client if asked.
- OpenRouter or other model gateways — configure the model provider in the IDE or in Settings where offered; Automation Skill Builder still runs tools on your machine.
- Third-party MCP servers — optional extras (databases, files, …) can sit beside this app; enable only what you trust.
Product reading: Configure OpenRouter in VS Code · Third-party MCP integration · Skills everywhere (MCP, VS Code, mobile).
- Return to the main flow (§8.1)
- Check Usage (§10.2)
- If the assistant cannot connect (§12.3)
Advanced11. Database tools
Some installs include database tools for AI assistants. Enable them from Settings when the option appears. If the UI asks for Docker, install Docker Desktop (or an equivalent) and pull the image name shown in Settings or the troubleshooting guide.
When Docker is required
- If the status in Settings / Health check is green, you are ready — no Docker steps needed.
- If the UI says an image is missing, open Docker Desktop → Images → Pull, enter the image name from the product message, then restart Skill Builder.
- If neither a built-in database helper nor Docker is available, the rest of the app still works; only database tools stay unavailable.
Step-by-step Docker pull screenshots: Database MCP troubleshooting.
11.1 Asking an AI assistant
After MCP is connected, ask clearly for the database action you want (which connection, which query). Prefer the tool names listed in your assistant’s tool picker so the model does not invent names.
Reference12. Troubleshooting
12.0 Symptom → where to fix
Match what you see, then open the linked section. Prefer fixing the first failure before re-recording.
| Symptom | Try this |
|---|---|
| Start AI design does nothing / no overlay | §8.1.1 · §12.3 · finish step 0 red items |
| Mouse / keyboard does nothing (macOS) | §12.1 — grant permissions, quit and restart |
| Screenshot blank or OCR “stuck” | §12.2 · Screen Recording permission |
| Clicks miss / wrong window | §12.7 · focus the window first · smaller OCR region |
| Run once fails mid-flow | §8.11 — find the first failing step |
| Skill installed but will not start | §12.5 · Security check · Health check |
| Quota / limit popup | §7.3 · §10.2 — package and run offline where possible |
| Control Panel blank | §12.6 — use current Chrome or Edge |
| Page blocked / looks wrong | §12.4 |
| Importing a colleague’s package | §8.8 → Run once → Security check |
12.1 Mouse / keyboard does nothing (macOS)
- System Settings → Privacy & Security: allow Skill Builder under Accessibility, Input Monitoring, and — for screenshots/OCR — Screen Recording.
- After changes, quit and restart Skill Builder.
12.2 OCR slow or “stuck”
- Full-screen OCR on CPU can take a long time — capture a smaller region.
- First run downloads models — keep disk space and network available.
12.3 AI assistant cannot connect
- Confirm the app is running and the Control Panel opens in the browser.
- Re-copy the connection URL and port from Settings into the assistant.
- If you enabled a Service API key in Security, paste the same key into the client fields that ask for it.
12.4 Page looks wrong or blocked
- Use the same address family the app shows (HTTP vs HTTPS).
- For HTTPS warnings, finish the trust steps in §5.1.
12.5 Skills will not start
- Open Sidebar → Health check & statistics and check FastSkills / Skill status.
- Offline or strict networks can block the first Skill runtime download — stay online once, or ask your administrator for an offline-ready install.
- Retry after a full app restart.
12.6 Control Panel blank (browser too old)
Use a current Chrome or Edge (Chromium). Very old corporate browsers often show a blank Sidebar — install a modern Chromium build on that machine.
12.7 Desktop pitfalls checklist
- Locked screen / remote session idle — mouse and keyboard actions fail; unlock and keep an interactive desktop.
- Wrong monitor — clicks land elsewhere; keep the target window on the primary display while recording and running.
- DPI / scaling changed — coordinates drift; match scale between design PC and run PC, or prefer OCR/text and Tab over raw coordinates.
- Window covered or minimized — restore and focus before each segment.
- App updated its layout — re-record only the broken segment (~minutes), not the whole project.
- IME / CJK typing — use clipboard paste instead of injected keystrokes.
Reference13. FAQ
Getting started
How do I install a license file?
Settings → Subscription & license → upload the .json file — §7.3.
Do I need an AI assistant?
No. Core workflows run in the Control Panel. Connecting an assistant is optional.
Do I need Python or Node.js?
Not to launch the packaged app. Follow in-app checks if an optional feature asks for more.
Which browser should I use?
Current Chrome or Edge (Chromium). See §12.6 if the page stays blank.
Privacy & deployment
Is my data sent to the cloud?
Automations run on your machine by default. Data leaves only when you enable external AI, model downloads, or other integrations you turn on.
Is this hosted SaaS?
No. You run the service locally (or on infrastructure you control).
Features & permissions
How do I import someone else’s package?
Toolbar Import Binary, then Run once and Security check — §8.8.
Classic recording or AI design?
Hand-driven capture → classic Start/Stop Recording. Assistant-driven via MCP → AI design. See §8.9.
Where do I install a Skill from ZIP?
Sidebar → Install skill — §8.12.
How do I automate different desktop apps?
Record one app/segment at a time, stabilize the window, and package separately — §9.4–§9.6.
Which build method should I pick?
Need a verified first run quickly → Method 3 (record then refactor). Same inner step reused everywhere → Method 2. Code-first team → Method 1. Details: §9.7.
Can I schedule a packaged executable?
Yes — in-app Schedule for focus windows, or export an OS scheduler file — §8.6.
Mouse or keyboard does nothing on macOS?
Enable Accessibility, Input Monitoring, and often Screen Recording, then restart — §12.1.
Why is OCR slow the first time?
Models download on first use; large regions on CPU can take minutes — §12.2.
Still need help?
- §12 Troubleshooting
- Prefer in-app Settings hints for your installed version.